7.4 Diagnose And Test
Fragment manuala — str. 364–367
📋 Tekst do skopiowania (OCR/wyszukiwanie)
DIAGNOSE AND TEST 7.4
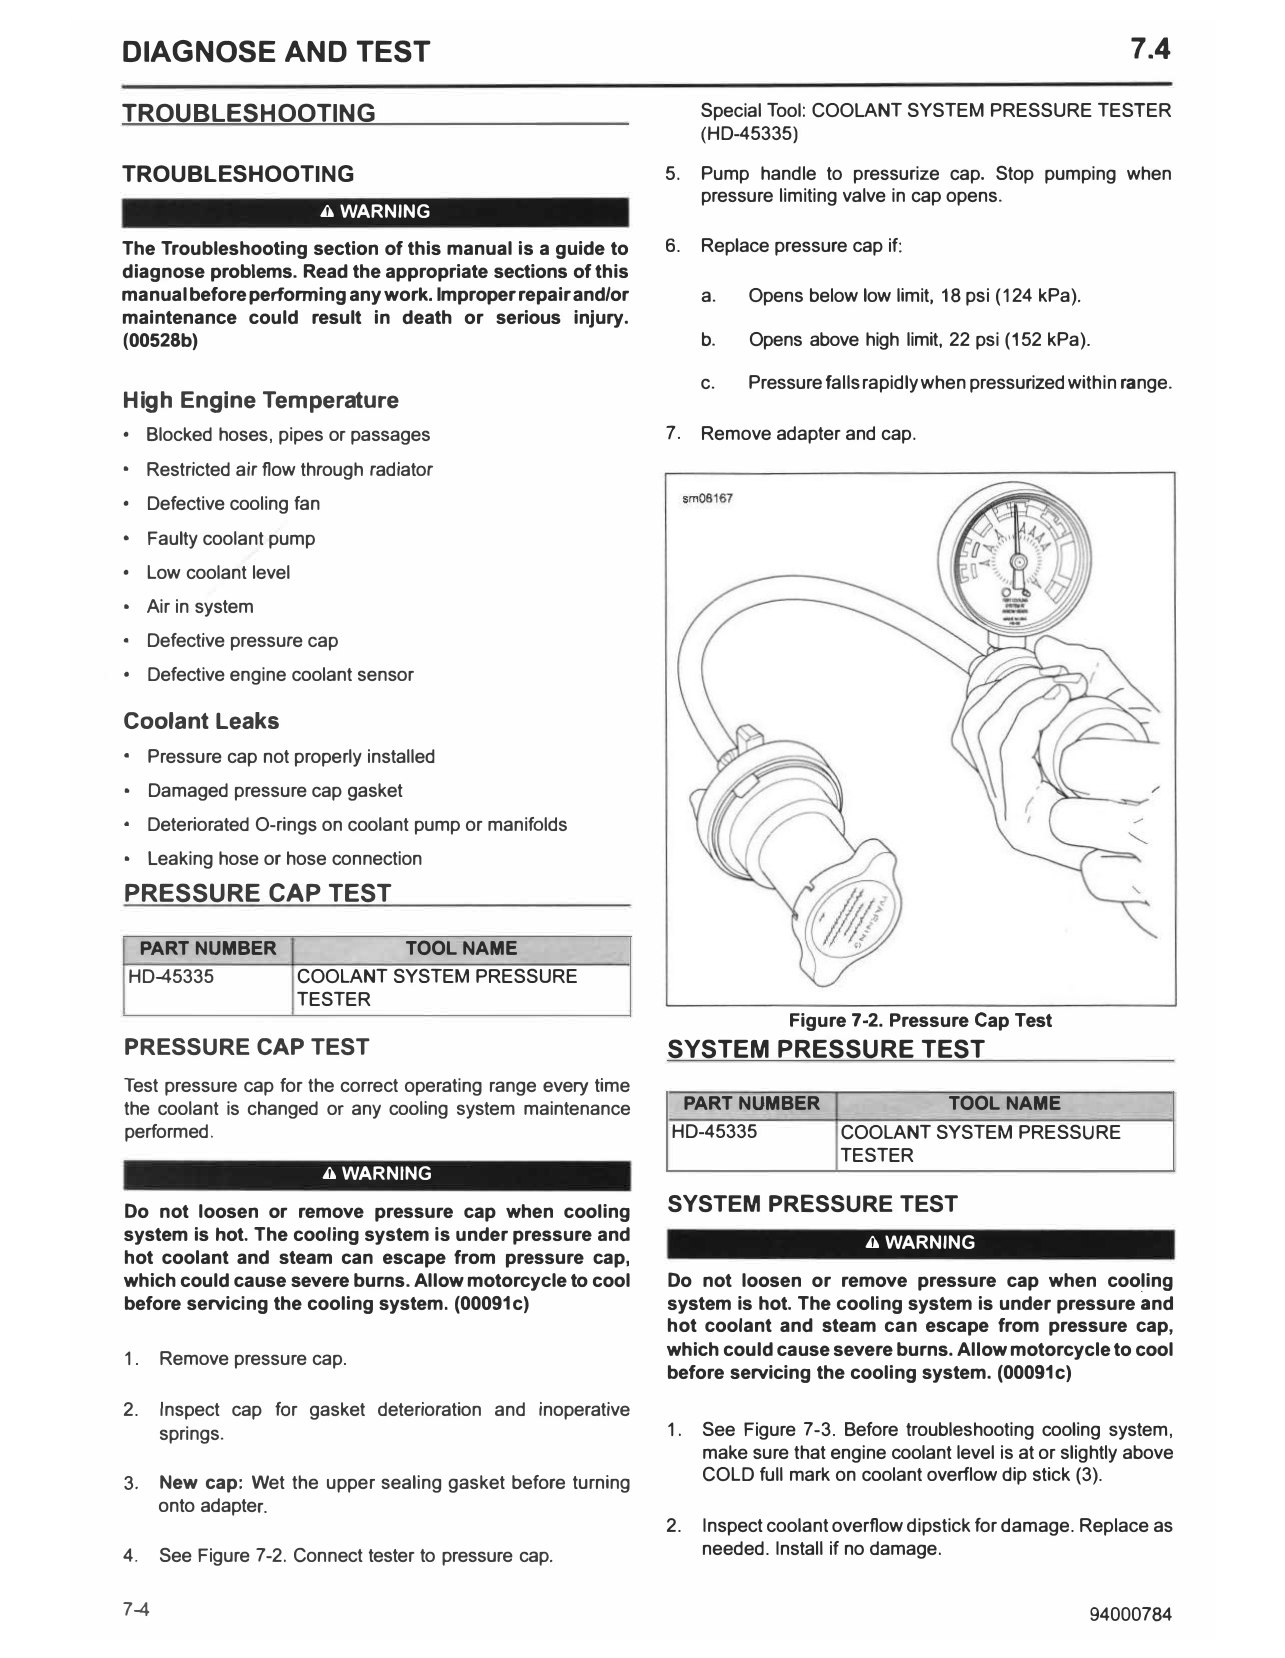
TROUBLESHOOTING Special Tool: COOLANT SYSTEM PRESSURE TESTER
(HD-45335)
TROUBLESHOOTING 5. Pump handle to pressurize cap. Stop pumping when
pressure limiting valve in cap opens.
A WARNING
The Troubleshooting section of this manual is a guide to 6. Replace pressure cap if:
diagnose problems. Read the appropriate sections of this
manual before perfonning any work. Improper repair and/or a. Opens below low limit, 18 psi (124 kPa).
maintenance could result in death or serious injury.
(00528b) b. Opens above high limit, 22 psi (152 kPa).
c. Pressure falls rapidly when pressurized within range.
High Engine Temperature
• Blocked hoses, pipes or passages 7. Remove adapter and cap.
• Restricted air flow through radiator
• Defective cooling fan
• Faulty coolant pump
• Low coolant level
• Air in system
• Defective pressure cap
• Defective engine coolant sensor
Coolant Leaks
• Pressure cap not properly installed
• Damaged pressure cap gasket
• Deteriorated O-rings on coolant pump or manifolds
• Leaking hose or hose connection
PRESSURE CAP TEST
PART NUMBER TOOL NAME
HD-45335 COOLANT SYSTEM PRESSURE
TESTER
Figure 7-2. Pressure Cap Test
PRESSURE CAP TEST SYSTEM PRESSURE TEST
Test pressure cap for the correct operating range every time
the coolant is changed or any cooling system maintenance PART NUMBER TOOL NAME
performed. HD-45335 COOLANT SYSTEM PRESSURE
TESTER
A WARNING
Do not loosen or remove pressure cap when cooling SYSTEM PRESSURE TEST
system is hot. The cooling system is under pressure and A WARNING
hot coolant and steam can escape from pressure cap,
which could cause severe burns. Allow motorcycle to cool Do not loosen or remove pressure cap when cooling
before servicing the cooling system. (00091c) system is hot. The cooling system is under pressure and
hot coolant and steam can escape from pressure cap,
which could cause severe burns. Allow motorcycle to cool
1. Remove pressure cap.
before servicing the cooling system. (00091c)
2. Inspect cap for gasket deterioration and inoperative
springs. 1. See Figure 7-3. Before troubleshooting cooling system,
make sure that engine coolant level is at or slightly above
3. New cap: Wet the upper sealing gasket before turning COLD full mark on coolant overflow dip stick (3).
onto adapter.
2. Inspect coolant overflow dipstick for damage. Replace as
4. See Figure 7-2. Connect tester to pressure cap. needed. Install if no damage.
7-4 94000784
NOTE
1562921
Damaged filler neck cams, safety stops and sealing
surfaces can cause cap to leak or affect the pressure
limiting valve. Replace radiator if damaged. Damaged cap
stop can also cause a coolant leak. Replace cap if
damaged.
3. Remove radiator cap (1).
4. Inspect radiator cap for damage. Replace as needed.
5. Clean and inspect filler neck (2), upper and lower sealing
seats, overflow tube and coolant overflow tank (3).
NOTE
Wet upper sealing surfaces before turning coolant system
pressure tester adapter onto tester head.
a. Filler neck (2).
'-·-------cv
------CV
b. Sealing seats, upper.
C. Sealing seats, lower.
d. Overflow tube.
e. Coolant overflow tank (3).
F
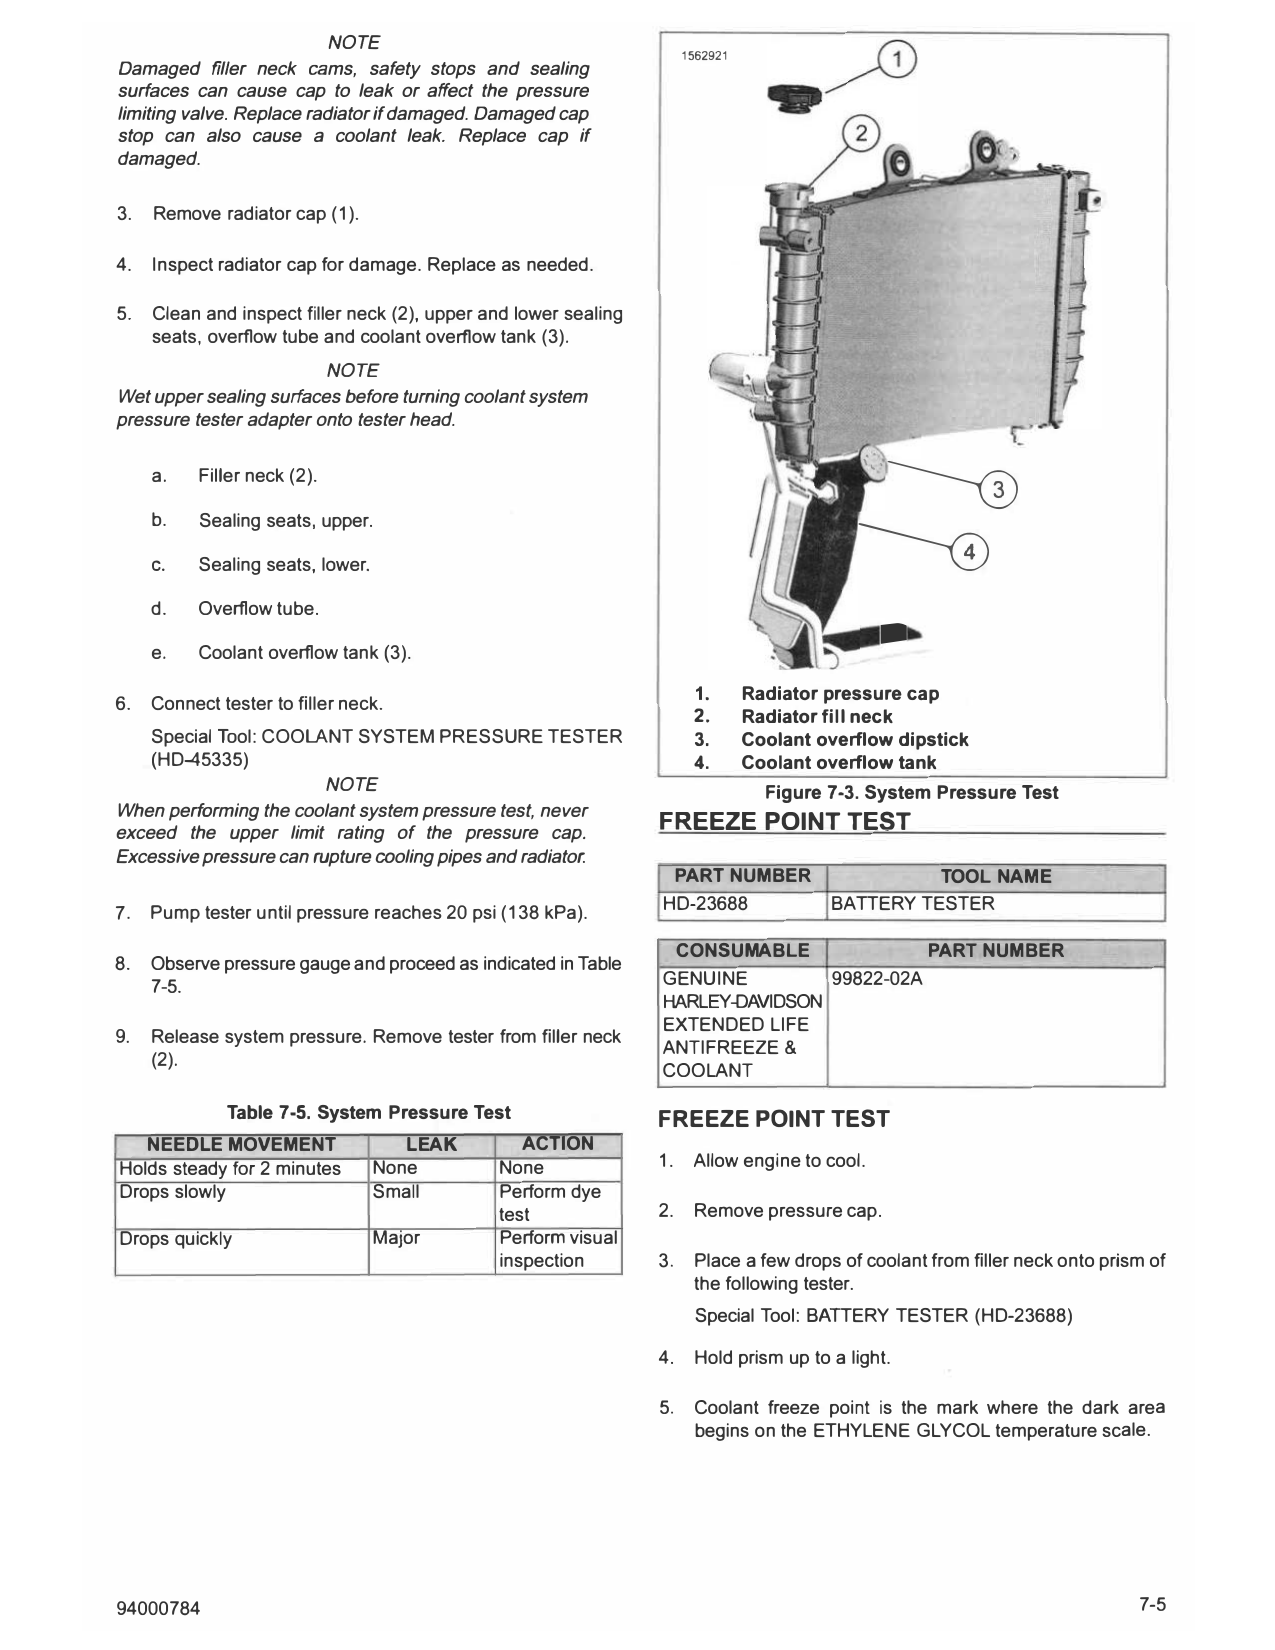
1. Radiator pressure cap
6. Connect tester to filler neck.
2. Radiator fill neck
Special Tool: COOLANT SYSTEM PRESSURE TESTER 3. Coolant overflow dipstick
(HD-45335) 4. Coolant overflow tank
NOTE Figure 7-3. System Pressure Test
When performing the coolant system pressure test, never
exceed the upper limit rating of the pressure cap.
FREEZE POINT TEST
Excessive pressure can rupture cooling pipes and radiator.
PART NUMBER TOOL NAME
Pump tester until pressure reaches 20 psi (138 kPa). HD-23688 BATTERY TESTER
7.
CONSUMABLE PART NUMBER
8. Observe pressure gauge and proceed as indicated in Table
7-5. GENUINE 99822-02A
HARLEY-DAVIDSON
EXTENDED LIFE
9. Release system pressure. Remove tester from filler neck
ANTIFREEZE &
(2).
COOLANT
Table 7-5. System Pressure Test FREEZE POINT TEST
NEEDLE MOVEMENT LEAK ACTION
Holds steady for 2 minutes None None 1. Allow engine to cool.
Drops slowly Small Perform dye
test 2. Remove pressure cap.
Drops quickly Major Perform visual
inspection 3. Place a few drops of coolant from filler neck onto prism of
the following tester.
Special Tool: BATTERY TESTER (HD-23688)
4. Hold prism up to a light.
5. Coolant freeze point is the mark where the dark area
begins on the ETHYLENE GLYCOL temperature scale.
94000784 7-5
6. Compare freeze point of coolant to anticipated operating NOTE
or storage temperatures. Replace as required. See Dye in the oil may indicate a damaged engine head gasket.
COOLANT (Page 7-8). Draining and replacing coolant contaminated oil is
necessary as part of engine service.
a. If indicated freeze point is less than specified on the
container, replace with antifreeze.
GASKET LEAK TEST
GENUINE HARLEY-DAVIDSON EXTENDED LIFE
ANTIFREEZE & COOLANT (99822-02A) PART NUMBER TOOLNAME
HD-45335 COOLANT SYSTEM PRESSURE
b. If anticipated cold temperatures exceed that of
TESTER
Harley-Davidson premixed antifreeze, replace with
a mixture of de-ionized water and ethylene glycol
antifreeze. Follow directions on the container to GASKET LEAK TEST
create a mixture with a freeze point that will exceed Perform the following tests if a leak exists but no external
the expected cold temperature. evidence of a leak is found.
7. Install pressure cap. 1. Start and run cold engine.
LEAK DETECTION DYE TEST a. White smoke from exhaust system indicates a
leaking gasket.
PART NUMBER TOOL NAME
2. Run engine. Turn off engine.
HD-29545-6A COOLANT FLUORESCENT LEAK
DETECTION DYE
a. Remove oil level dipstick. Light-colored foam on
HD-35457 BLACK LIGHT LEAK DETECTOR
dipstick indicates a leaking gasket.
LEAK DETECTION DYE TEST b. Open oil drain plug. Drain a small amount of oil.
Water or coolant drains out first if gasket is leaking.
1. See Figure 7-3. Before troubleshooting cooling system,
make sure that engine coolant level is at COLD FULL mark NOTE
on coolant overflow dipstick (3). • Do not allow pressure to build up past maximum
NOTE for system. If pressure rises past maximum, turn
off engine and turn butfP.rf/y pressure valve
If coolant overflow tank is empty when engine is cold, air
perpendicular to tester h&aa to release pressure.
has possibly been drawn into coolant system. Fill system
with coolant and purge any trapped air. • Do not continue to run engine unattended with
COOLANT SYSTEM PRESSURE TESTER
(PART NUMBER: HD-45335) installed. There is
A WARNING
no safety valve with the pressure cap removed
Do not loosen or remove pressure cap when cooling and the COOLANT SYSTEM PRESSURE
system is hot. The cooling system is under pressure and TESTER (PART NUMBER: HD-45335) installed.
hot coolant and steam can escape from pressure cap,
which could cause severe burns. Allow motorcycle to cool 3. Install tester.
before servicing the cooling system. (00091c)
Special Tool: COOLANT SYSTEM PRESSURE TESTER
(HD-45335)
2. Remove radiator pressure cap (1).
A WARNING
3. If filler neck is full of coolant, remove an amount of coolant
Disconnecting spark plug cable with engine running can
equal to the amount of dye.
result in electric shock and death or serious injury.
(00464b)
4. Pour dye into filler neck (2).
Special Tool: COOLANT FLUORESCENT LEAK 4. Start cold engine and idle engine to normal operating
DETECTION DYE (HD-29545-6A) temperature.
5. Install radiator cap. Run engine for 10 minutes.
a. If gauge indicates fast pressure buildup, a gasket is
leaking.
6. Use detector to illuminate entire cooling system. A yellow
fluorescence indicates a leak.
b. If pressure does not build up immediately, pump the
Special Tool: BLACK LIGHT LEAK DETECTOR tester to 20 psi (138 kPa).
(HD-35457)
c. A vibrating needle indicates a leaking cylinder head
7. Inspect engine oil for yellow dye. gasket.
7-6 94000784
d. Turn off engine. Disable one spark plug at the coil. NOTE
Start engine. Repeat for other cylinder. The needle Always replace engine oil after replacing cylinder head gasket.
stops vibrating when spark is removed from leaking
cylinder.
94000784 7-7