🏍️ PAN AMERICA SERWIS

3.30 Cowl

Fragment manuala — str. 164–166

📋 Tekst do skopiowania (OCR/wyszukiwanie)
COWL                                                                                                              3.30

REMOVE AND INSTALL: COWL
                                                            Complete
        FASTENER                        TORQUE VALUE        1.   Install main    fuse.   See   POWER         DISCONNECT
Cowl screw                          71-89 in-lbs 8-10 N·m        (Page 8-4).

Prepare                                                     2.   Install fairing. See FAIRING (Page 3-89).

1.   Remove main fuse. See POWER DISCONNECT
     (Page 8-4).
                                                            DISASSEMBLE AND ASSEMBLE: COWL

                                                                    FASTENER                     TORQUE VALUE
2.   Remove fairing. See FAIRING (Page 3-89).
                                                            Arm and lever screws             9-13 in-lbs  1-1.5 N·m
                                                            Cowl connector screw            22-29 in-lbs 2.5-3.3 N·m
Remove
                                                            Cowl deflector screw            22-29 in-lbs 2.5-3.3 N·m
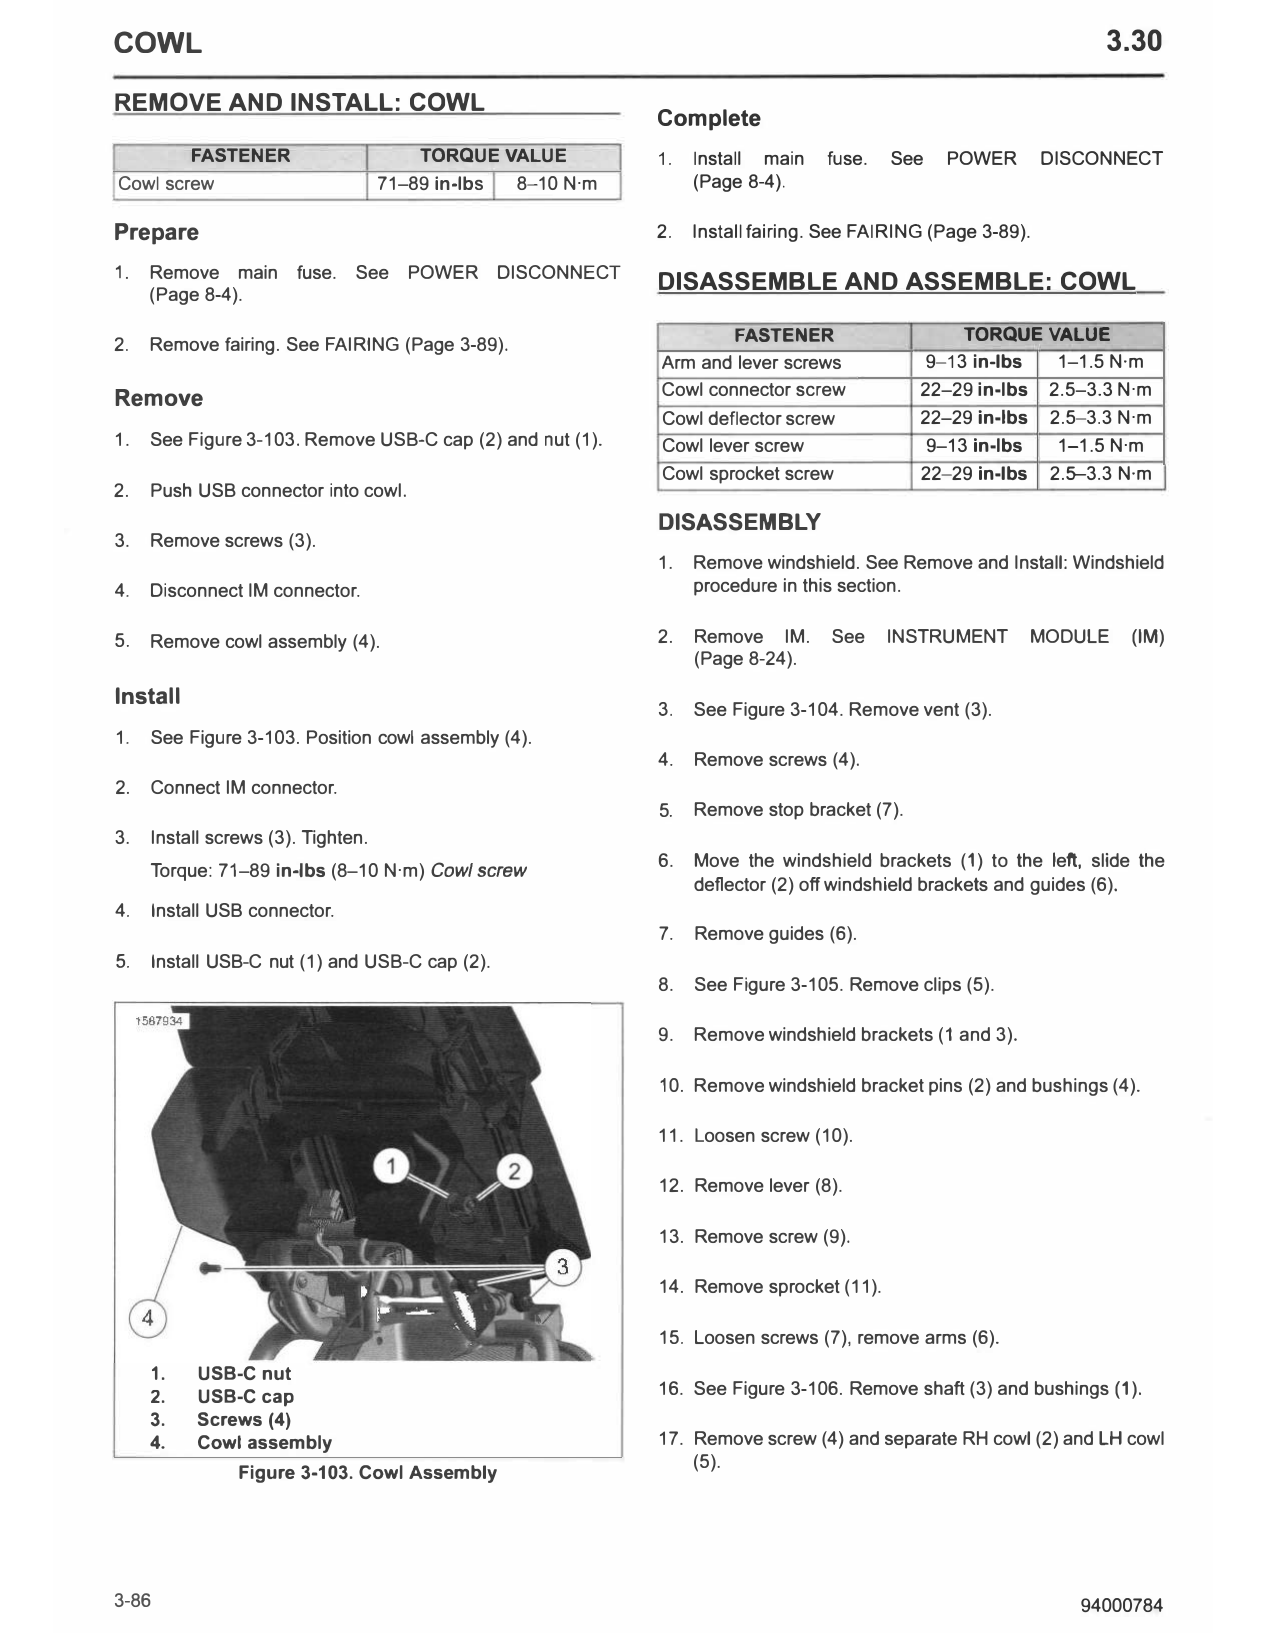
1.   See Figure 3-103. Remove USB-C cap (2) and nut (1).    Cowl lever screw                 9-13 in-lbs  1-1.5 N·m
                                                            Cowl sprocket screw             22-29 in-lbs 2.5--3.3 N·m
2.   Push USB connector into cowl.
                                                            DISASSEMBLY
3.   Remove screws (3).
                                                            1.   Remove windshield. See Remove and Install: Windshield
4.   Disconnect IM connector.                                    procedure in this section.

5.   Remove cowl assembly (4).                              2.   Remove IM.      See     INSTRUMENT      MODULE     (IM)
                                                                 (Page 8-24).

Install
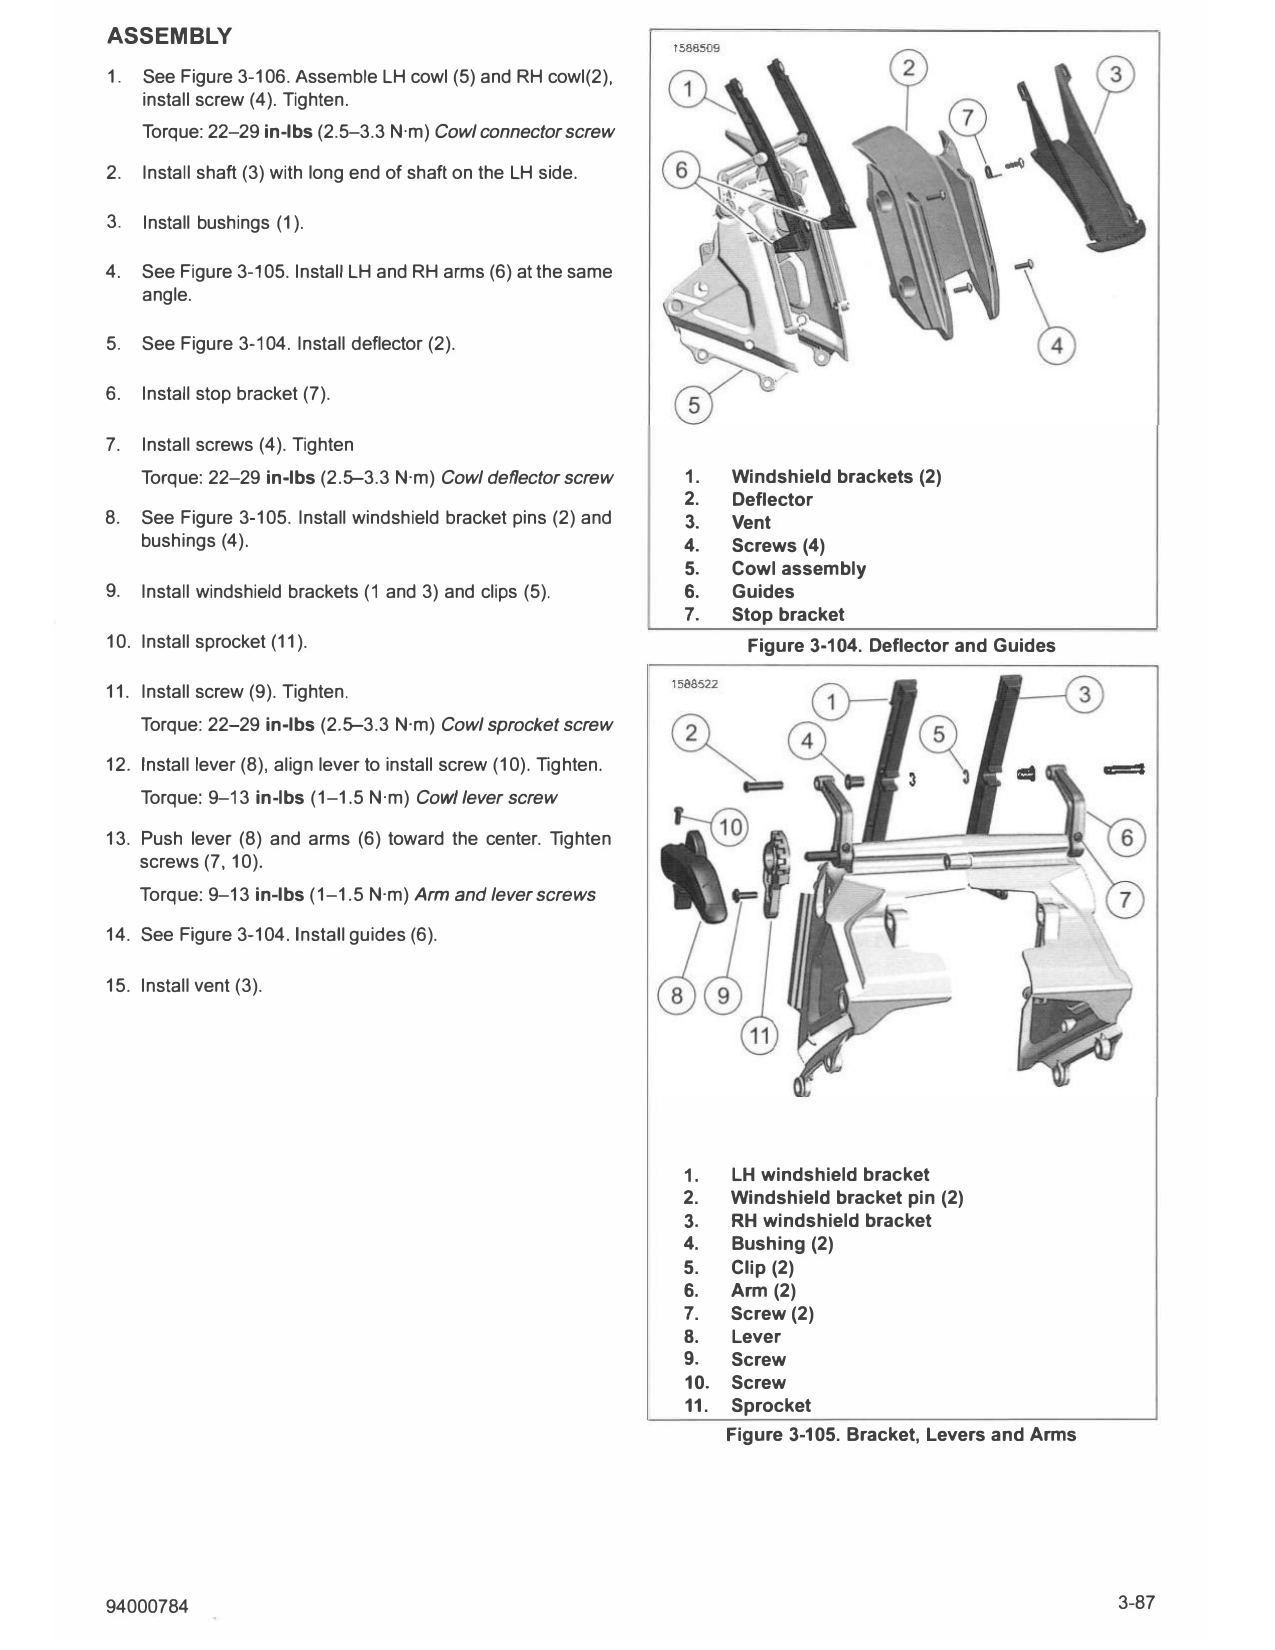
                                                            3.   See Figure 3-104. Remove vent (3).
1.   See Figure 3-103. Position cowl assembly (4).
                                                            4.   Remove screws (4).
2.   Connect IM connector.
                                                            5.   Remove stop bracket (7).
3.   Install screws (3). Tighten.
                                                            6.   Move the windshield brackets (1) to the left, slide the
     Torque: 71-89 in-lbs (8-10 N·m) Cowl screw
                                                                 deflector (2) off windshield brackets and guides (6).
4.     Install USB connector.
                                                            7.   Remove guides (6).
5.     Install USB-C nut (1) and USB-C cap (2).
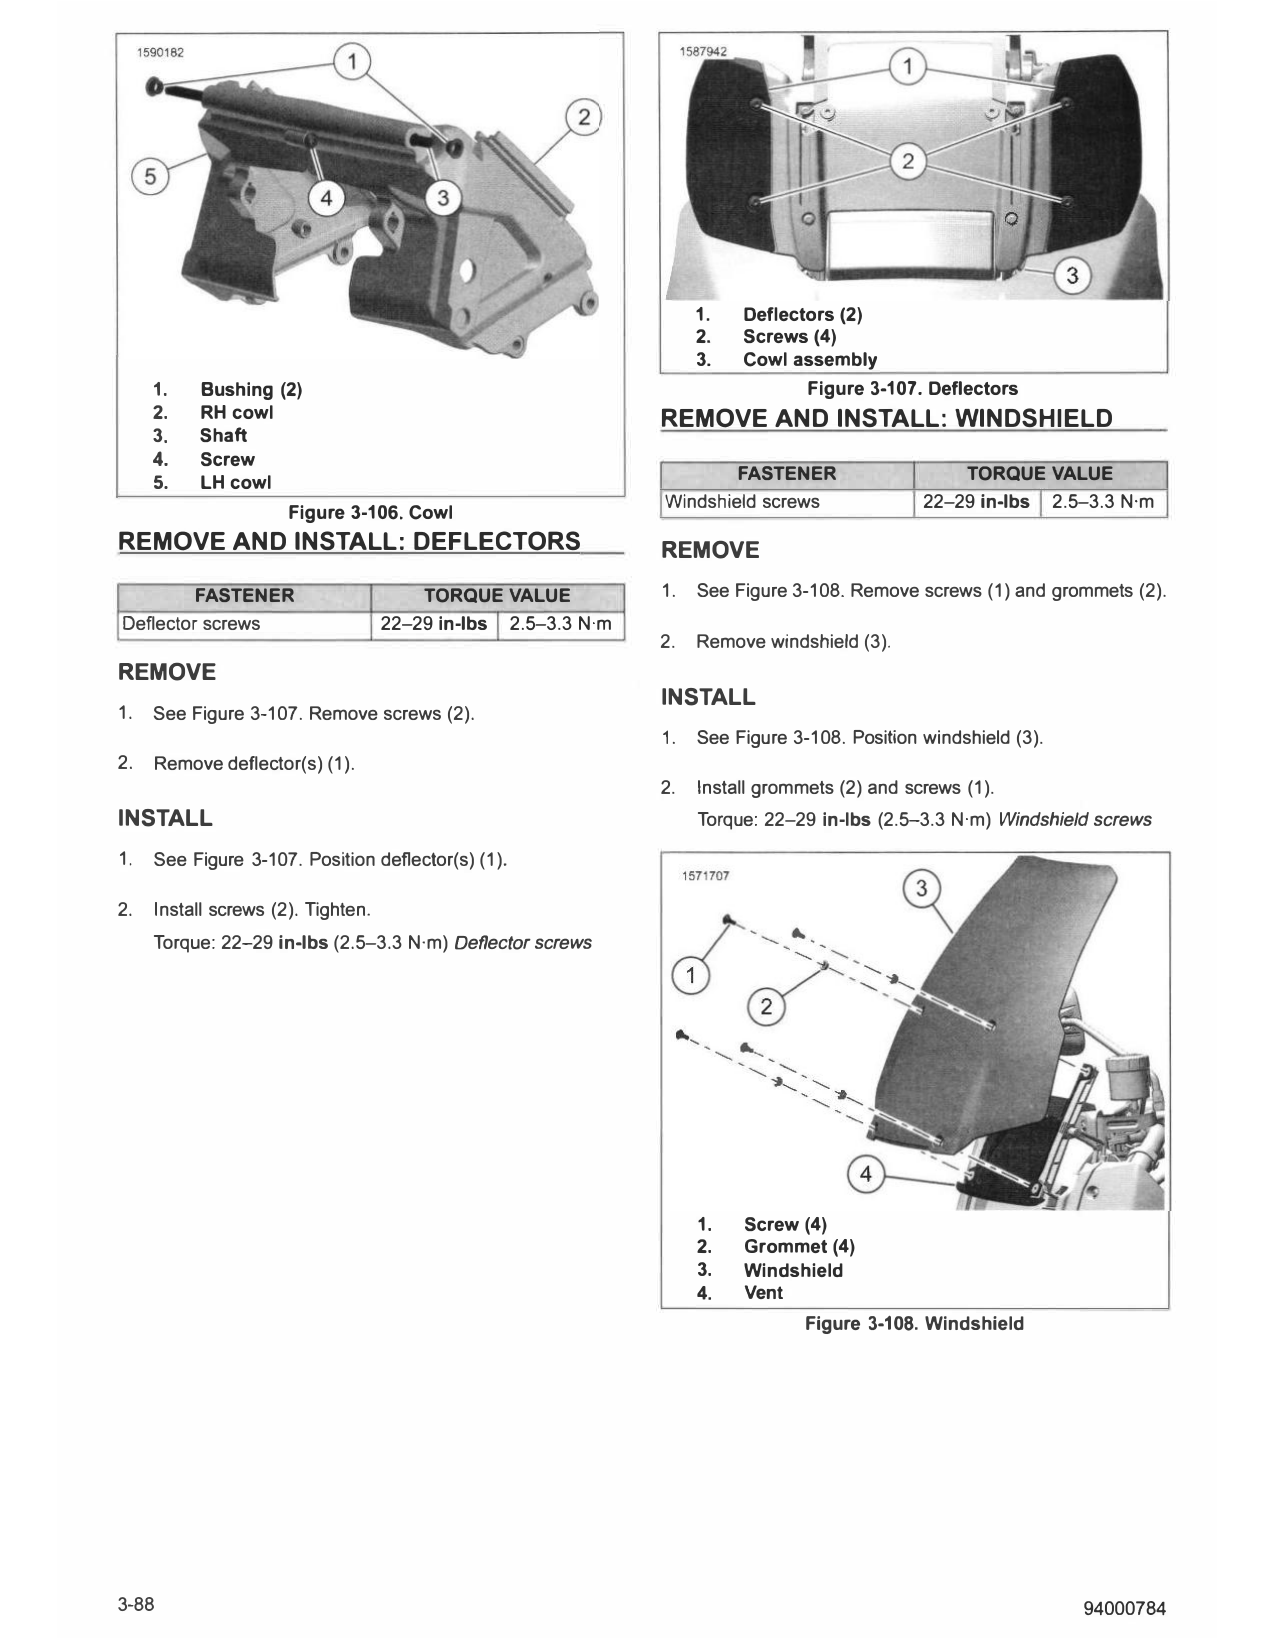
                                                            8.   See Figure 3-105. Remove clips (5).

                                                            9.   Remove windshield brackets (1 and 3).

                                                            10. Remove windshield bracket pins (2) and bushings (4).

                                                            11. Loosen screw (10).

                                                            12. Remove lever (8).

                                                            13. Remove screw (9).

                                                            14. Remove sprocket (11).

                                                            15. Loosen screws (7), remove arms (6).
     1.     USB-C nut
     2.     USB-C cap                                       16. See Figure 3-106. Remove shaft (3) and bushings (1).
     3.     Screws (4)
     4.     Cowl assembly                                   17. Remove screw (4) and separate RH cowl (2) and LH cowl
                                                                (5).
                 Figure 3-103. Cowl Assembly

3-86                                                                                                            94000784
ASSEMBLY
1.   See Figure 3-106. Assemble LH cowl (5) and RH cowl(2),
     install screw (4). Tighten.
     Torque: 22-29 in-lbs (2.5-3.3 N·m) Cowl connector screw

2.   Install shaft (3) with long end of shaft on the LH side.

3.   Install bushings (1 ).

4.   See Figure 3-105. Install LH and RH arms (6) at the same
     angle.

5.   See Figure 3-104. Install deflector (2).

6.   Install stop bracket (7).

7.   Install screws (4). Tighten
     Torque: 22-29 in-lbs (2.5-3.3 N·m) Cowl deflector screw         1.    Windshield brackets (2)
                                                                     2.    Deflector
8.   See Figure 3-105. Install windshield bracket pins (2) and       3.    Vent
     bushings (4).                                                   4.    Screws (4)
                                                                     5.    Cowl assembly
9.   Install windshield brackets (1 and 3) and clips (5).            6.    Guides
                                                                     7.    Stop bracket
10. Install sprocket (11).                                                   Figure 3-104. Deflector and Guides

11. Install screw (9). Tighten.
     Torque: 22-29 in-lbs (2.5-3.3 N·m) Cowl sprocket screw

12. Install lever (8), align lever to install screw (10). Tighten.
     Torque: 9-13 in-lbs (1-1.5 N·m) Cow/lever screw

13. Push lever (8) and arms (6) toward the center. Tighten
    screws (7, 10).
     Torque: 9-13 in-lbs (1-1.5 N·m) Arm and lever screws

14. See Figure 3-104. Install guides (6).

15. Install vent (3).

                                                                     1.    LH windshield bracket
                                                                     2.    Windshield bracket pin (2)
                                                                     3.    RH windshield bracket
                                                                     4.    Bushing (2)
                                                                     5.    Clip (2)
                                                                     6.    Arm (2)
                                                                     7.    Screw (2)
                                                                     8.    Lever
                                                                     9.    Screw
                                                                     10.   Screw
                                                                     11.   Sprocket
                                                                           Figure 3-105. Bracket, Levers and Arms

94000784                                                                                                            3-87
                                                                       1.   Deflectors (2)
                                                                       2.   Screws (4)
                                                                       3.   Cowl assembly
     1.   Bushing (2)                                                               Figure 3-107. Deflectors
     2.   RH cowl                                                 REMOVE AND INSTALL: WINDSHIELD
     3.   Shaft
     4.   Screw
     5.   LH cowl                                                           FASTENER                  TORQUE VALUE
                                                                  Windshield screws               22-29 in-lbs 2.5-3.3 N·m
                      Figure 3-106. Cowl
REMOVE AND INSTALL: DEFLECTORS                                    REMOVE
         FASTENER                       TORQUE VALUE              1.   See Figure 3-108. Remove screws (1) and grommets (2).
Deflector screws                    22-29 in-lbs    2.5-3.3 N·m
                                                                  2.   Remove windshield (3).
REMOVE
                                                                  INSTALL
1.   See Figure 3-107. Remove screws (2).
                                                                  1.   See Figure 3-108. Position windshield (3).
2.   Remove deflector(s) (1).
                                                                  2.   Install grommets (2) and screws (1).
INSTALL                                                                Torque: 22-29 in-lbs (2.5-3.3 N·m) Windshield screws

1.   See Figure 3-107. Position deflector(s) (1).

2.   Install screws (2). Tighten.
     Torque: 22-29 in-lbs (2.5-3.3 N·m) Deflector screws

                                                                       1.   Screw (4)
                                                                       2.   Grommet (4)
                                                                       3.   Windshield
                                                                       4.   Vent
                                                                                    Figure 3-108. Windshield

3-88                                                                                                                94000784