2.16 Inspect And Adjust Drive Chain And Sprockets
Fragment manuala — str. 57–59
📋 Tekst do skopiowania (OCR/wyszukiwanie)
INSPECT AND ADJUST DRIVE CHAIN AND SPROCKETS 2.16
INSPECT 1. Measure drive chain for excessive wear.
General a. Installed: Place transmission in first gear.
The rear chain should be checked for worn chain links and b. Pull rear of wheel down to tension upper portion of
correct adjustment. As chains stretch and wear in service, they chain.
will run tighter at one point on the sprocket. Always rotate rear
wheel and check adjustment at tightest point of chain. c. Removed: Lay one strand of chain flat on bench.
Chain deflection is critical to increased life of the chain and d. Secure one end to bench.
sprockets. Check deflection as instructed in Measure Drive
Chain Deflection in this section. Too tight may cause premature e. Tension chain with Weight: 44.1 lb (20 kg) load.
wear, damage and breakage. Too loose may cause premature
wear, excessive noise and poor transition between acceleration 2. See Figure 2-26. Measure distance at centers of 16 pins
and deceleration. apart.
Cleaning and Lubrication a. Replace chain if distance exceeds dimension.
After inspecting chain deflection, clean chain and sprockets
10.1 in (256.5 mm)
while rotating rear wheel. Use a dry cloth with chain cleaner
designed for O-ring chains, or neutral detergent. Use a soft
brush if chain is dirty.
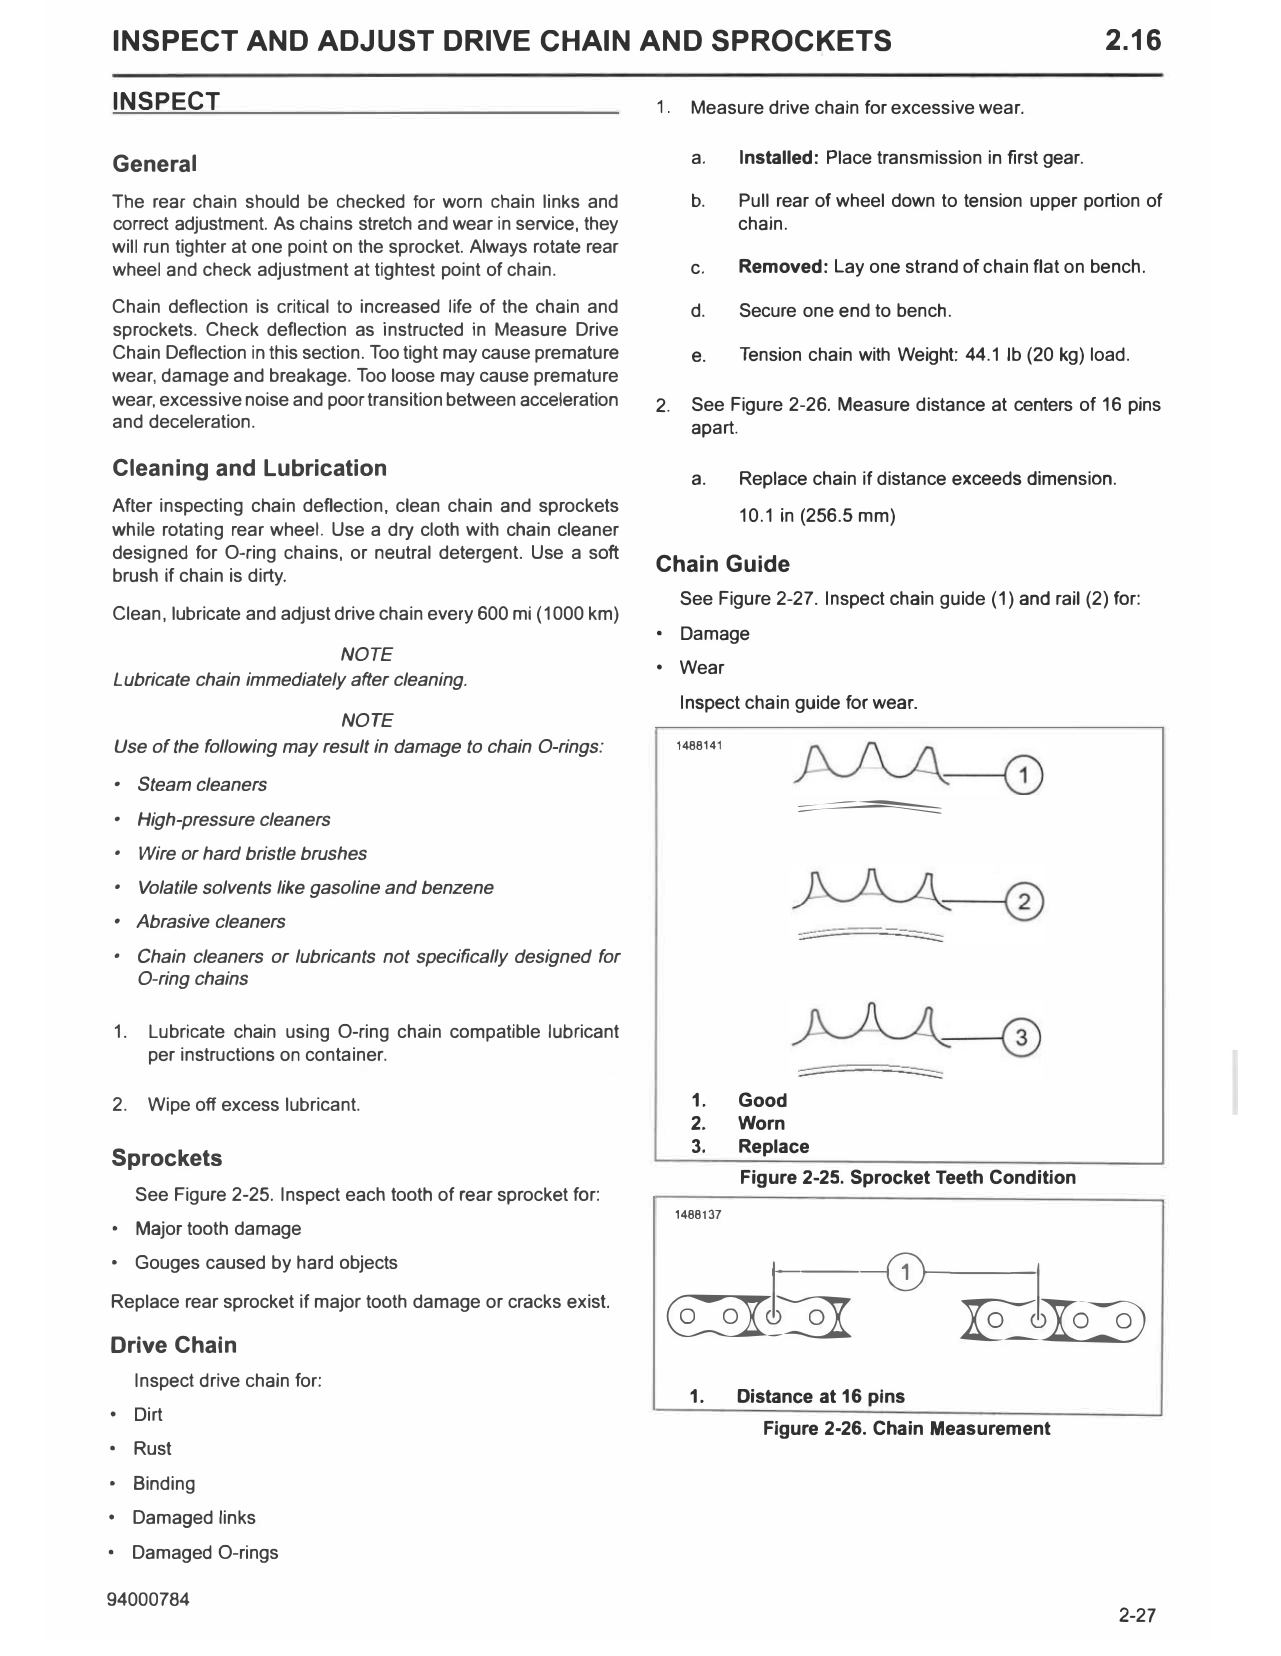
Chain Guide
See Figure 2-27. Inspect chain guide (1) and rail (2) for:
Clean, lubricate and adjust drive chain every 600 mi (1000 km)
• Damage
NOTE
• Wear
Lubricate chain immediately after cleaning.
Inspect chain guide for wear.
NOTE
Use of the following may result in damage to chain O-rings: 1488141
• Steam cleaners
• High-pressure cleaners
:::::::======::
• Wire or hard bristle brushes
• Volatile solvents like gasoline and benzene
• Abrasive cleaners
• Chain cleaners or lubricants not specifically designed for
O-ring chains
1. Lubricate chain using O-ring chain compatible lubricant
per instructions on container.
2. Wipe off excess lubricant. 1. Good
2. Worn
3. Replace
Sprockets
Figure 2-25. Sprocket Teeth Condition
See Figure 2-25. Inspect each tooth of rear sprocket for:
1488137
• Major tooth damage
• Gouges caused by hard objects It-----;CD,...____,,
Replace rear sprocket if major tooth damage or cracks exist.
� �
Drive Chain
Inspect drive chain for:
1. Distance at 16 pins
• Dirt
Figure 2-26. Chain Measurement
• Rust
• Binding
• Damaged links
• Damaged O-rings
1487502
r
-
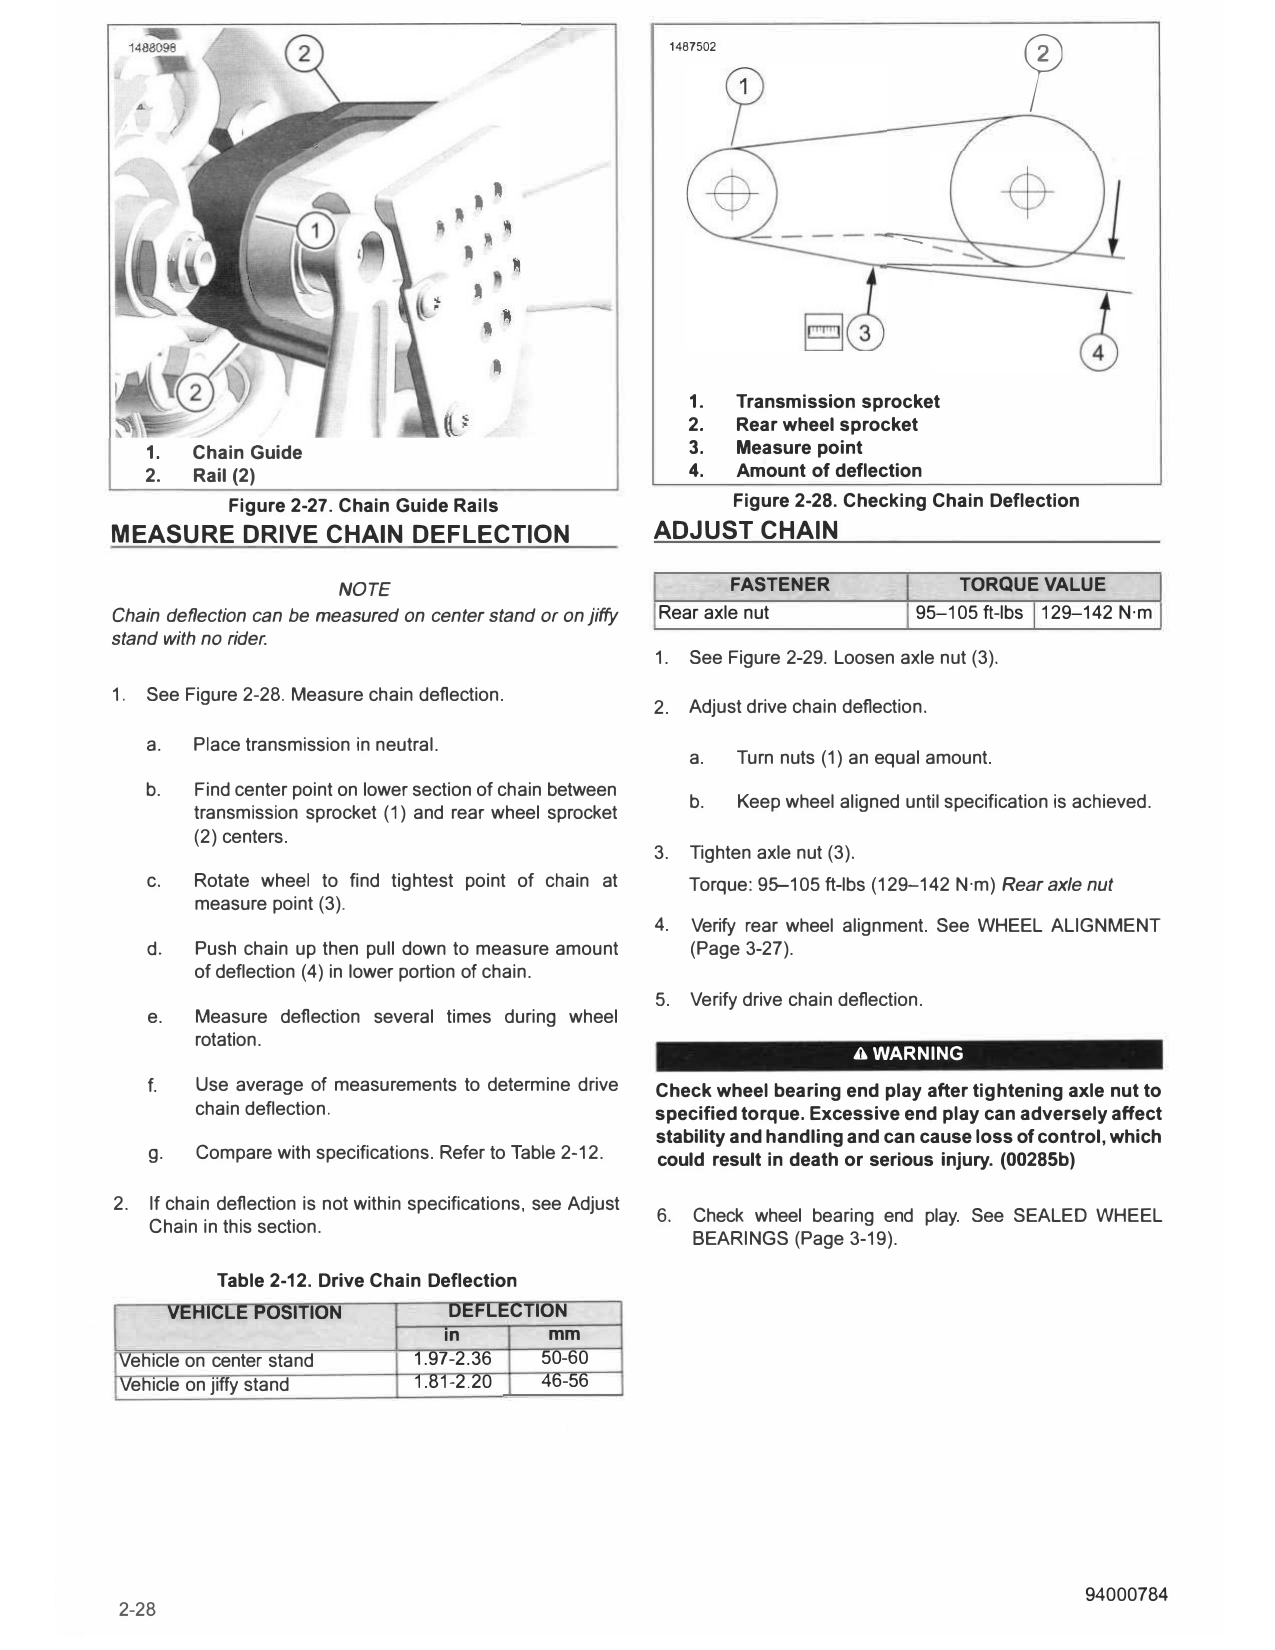
1. Transmission sprocket
2. Rear wheel sprocket
1. Chain Guide 3. Measure point
2. Rail (2) 4. Amount of deflection
Figure 2-27. Chain Guide Rails Figure 2-28. Checking Chain Deflection
MEASURE DRIVE CHAIN DEFLECTION ADJUST CHAIN
NOTE FASTENER TORQUE VALUE
Chain deflection can be measured on center stand or on jiffy Rear axle nut 95-105 ft-lbs 129-142 N·m
stand with no rider.
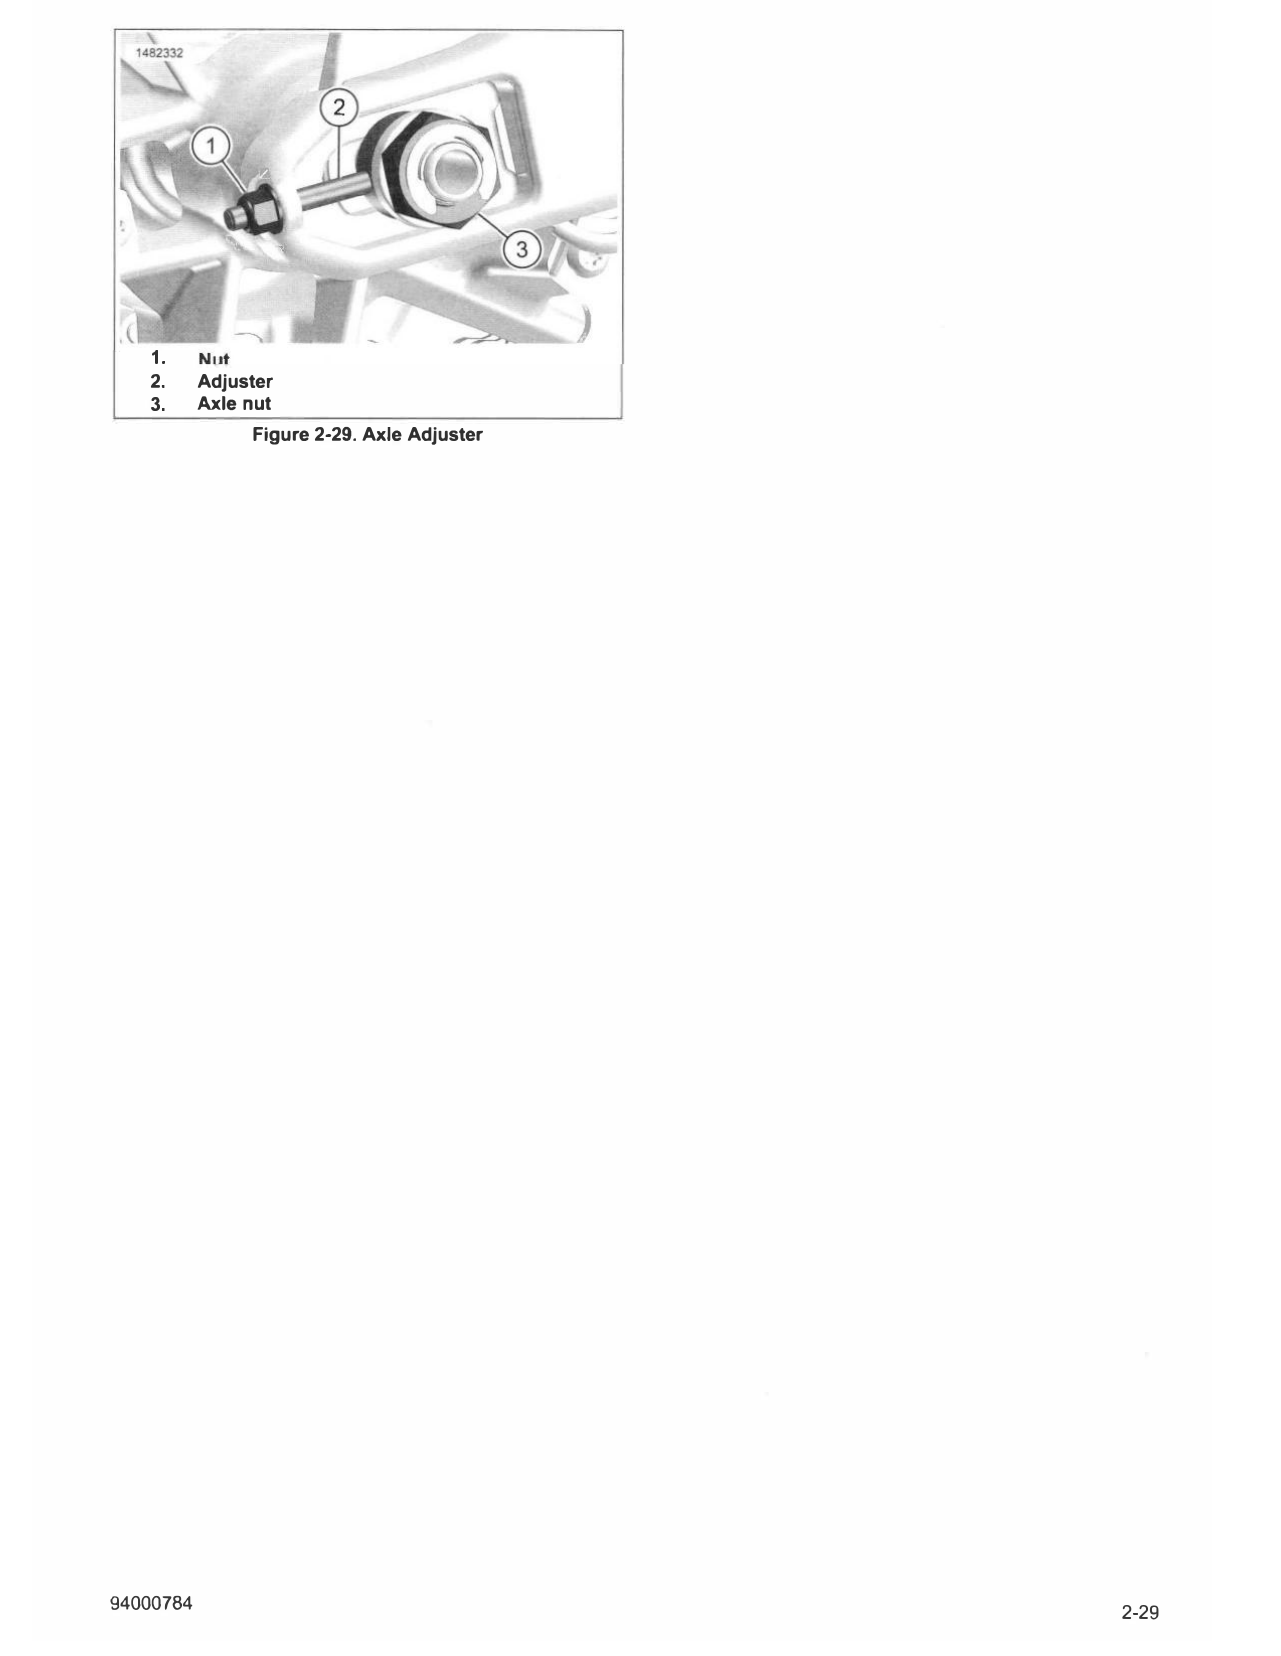
1. See Figure 2-29. Loosen axle nut (3).
1. See Figure 2-28. Measure chain deflection.
2. Adjust drive chain deflection.
a. Place transmission in neutral.
a. Turn nuts (1) an equal amount.
b. Find center point on lower section of chain between
b. Keep wheel aligned until specification is achieved.
transmission sprocket (1) and rear wheel sprocket
(2) centers.
3. Tighten axle nut (3).
c. Rotate wheel to find tightest point of chain at Torque: 9�105 ft-lbs (129-142 N·m) Rear axle nut
measure point (3).
4. Verify rear wheel alignment. See WHEEL ALIGNMENT
d. Push chain up then pull down to measure amount (Page 3-27).
of deflection (4) in lower portion of chain.
5. Verify drive chain deflection.
e. Measure deflection several times during wheel
rotation.
A WARNING
f. Use average of measurements to determine drive Check wheel bearing end play after tightening axle nut to
chain deflection. specified torque. Excessive end play can adversely affect
stability and handling and can cause loss of control, which
g. Compare with specifications. Refer to Table 2-12. could result in death or serious injury. (00285b)
2. If chain deflection is not within specifications, see Adjust
6. Check wheel bearing end play. See SEALED WHEEL
Chain in this section.
BEARINGS (Page 3-19).
Table 2-12. Drive Chain Deflection
VEHICLE POSITION DEFLECTION
in mm
Vehicle on center stand 1.97-2.36 50-60
Vehicle on jiffy stand 1.81-2.20 46-56
1.
2. Adjuster
3. Axle nut
Figure 2-29. Axle Adjuster
94000784 2-29