🏍️ PAN AMERICA SERWIS

5.9 Transmission

Fragment manuala — str. 308–310

📋 Tekst do skopiowania (OCR/wyszukiwanie)
TRANSMISSION                                                                                                                      5.9

PREPARE                                                                DISASSEMBLE

1.     Use low-pressure compressed air to clean exterior surfaces      Input Shaft
       of engine and vehicle.
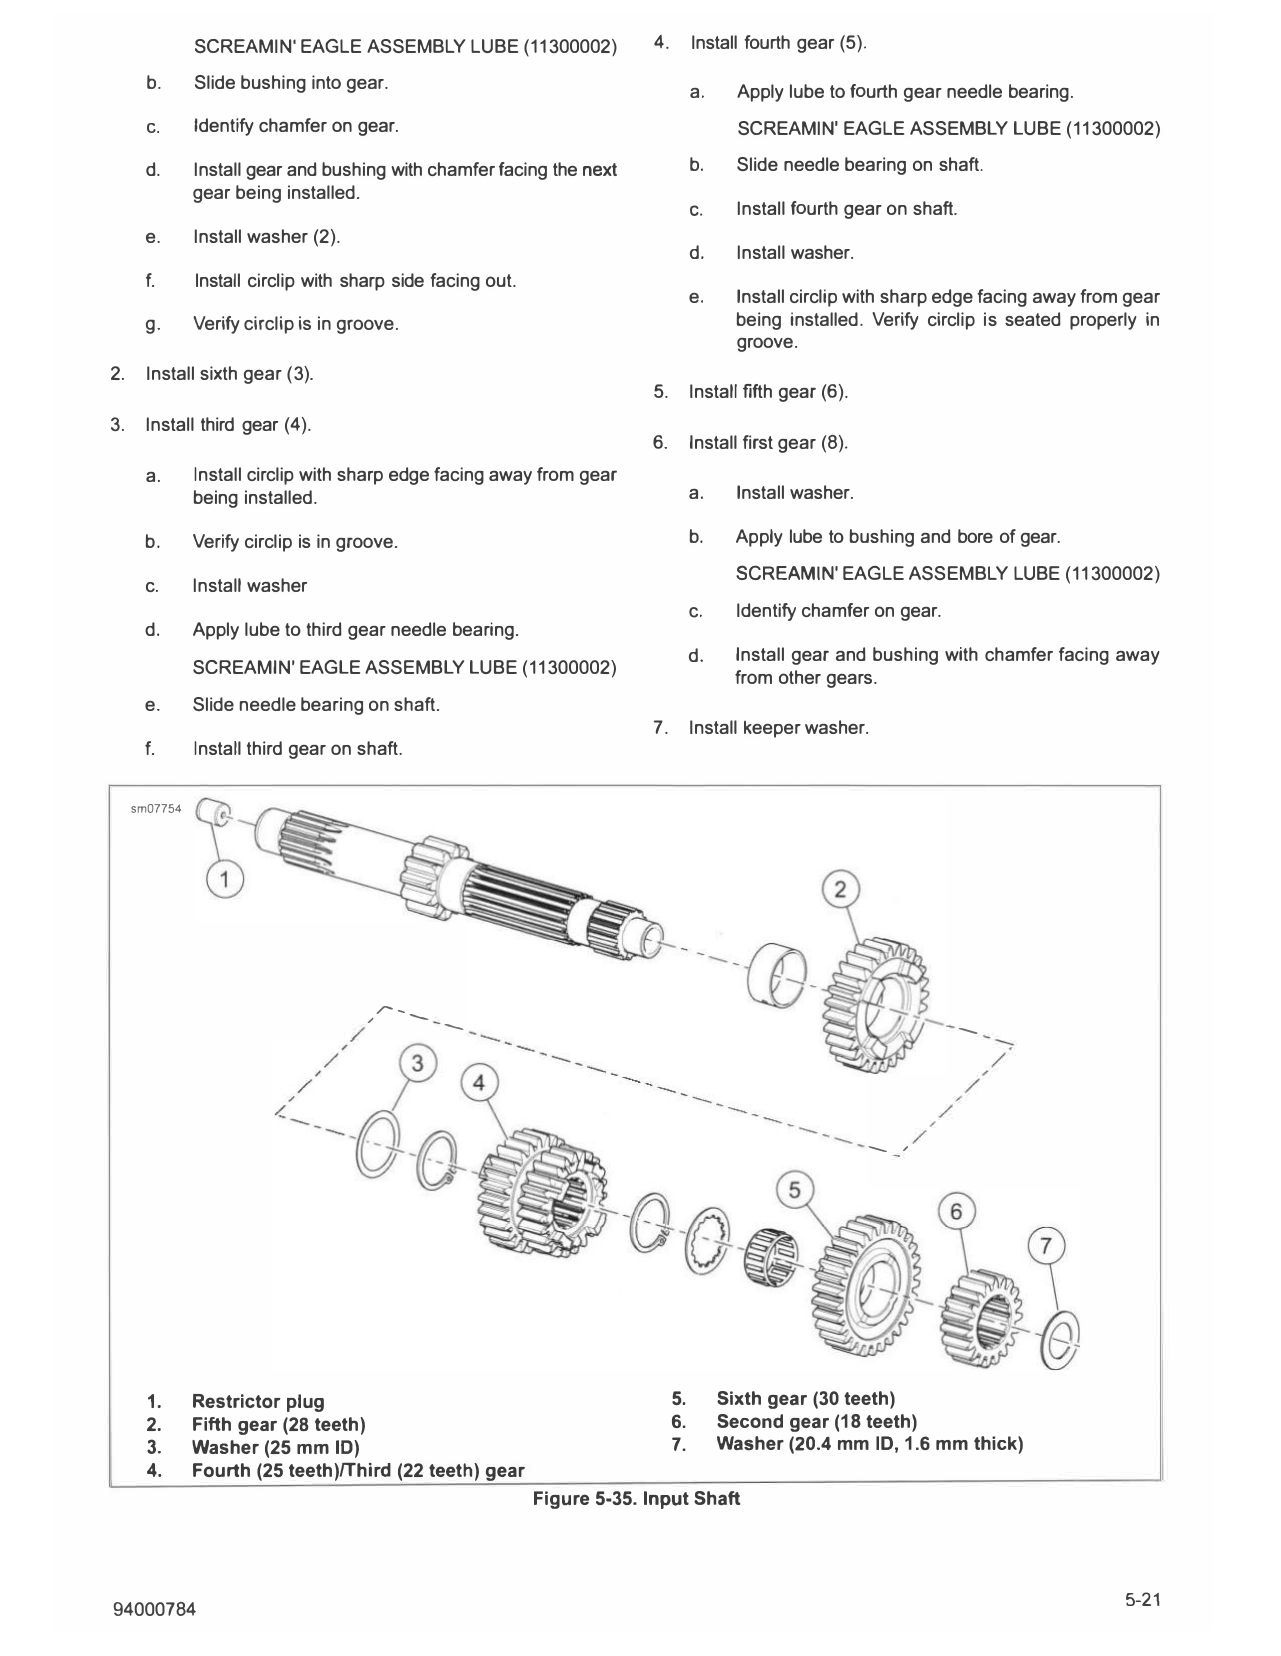
                                                                       See Figure 5-35. Remove gears (2 through 6) from input shaft.
2.     Remove main fuse.            See POWER DISCONNECT
       (Page 8-4).                                                     Output Shaft
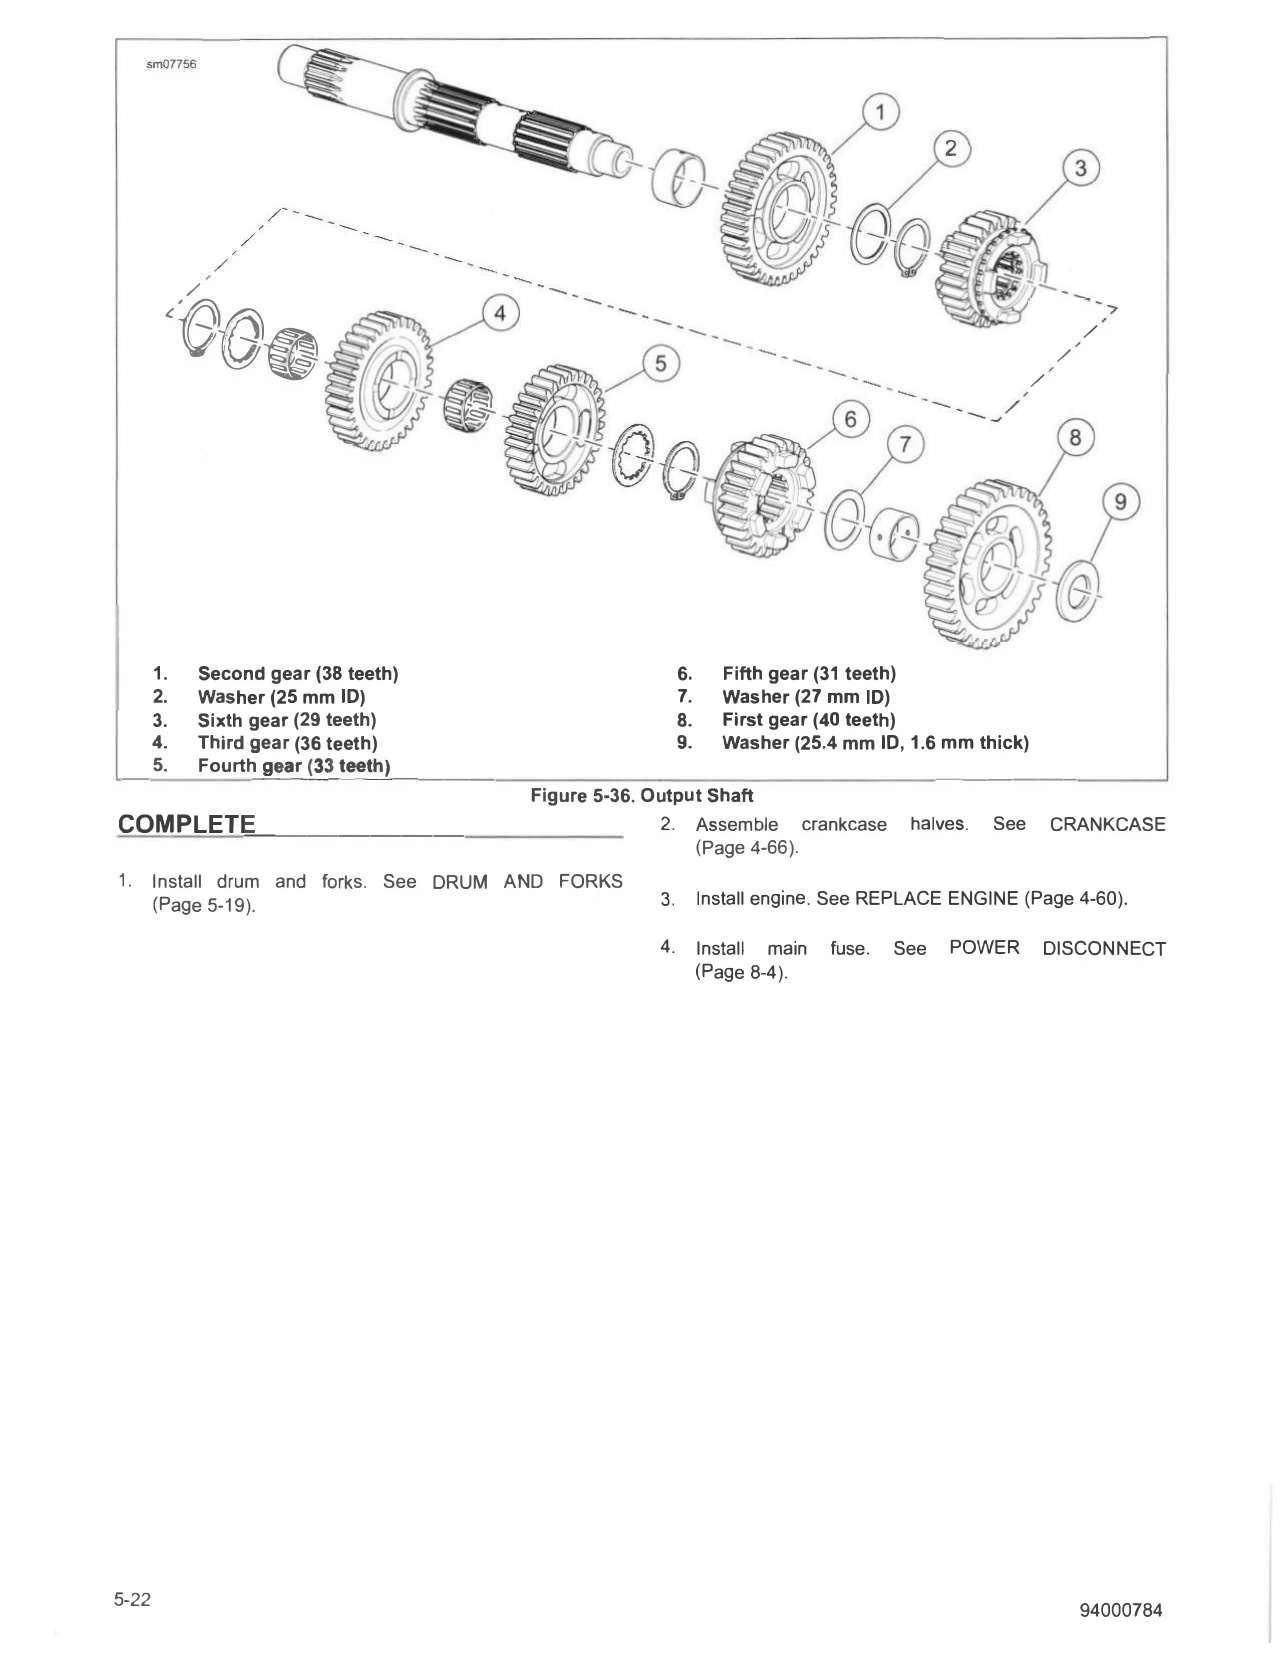
                                                                       See Figure 5-36. Remove gears (1 through 8) from output
3.     Remove engine. See REPLACE ENGINE (Page 4-60).                  shaft.

4.     Separate crankcase           halves.   See    CRANKCASE         ASSEMBLE
       (Page 4-66).
                                                                        CONSUMABLE            PART NUMBER
5.     Remove drum and forks. See DRUM AND FORKS                       SCREAMIN'     11300002
       (Page 5-19).                                                    EAGLE
                                                                       ASSEMBLY LUBE
REMOVE
                                                                       Input Shaft
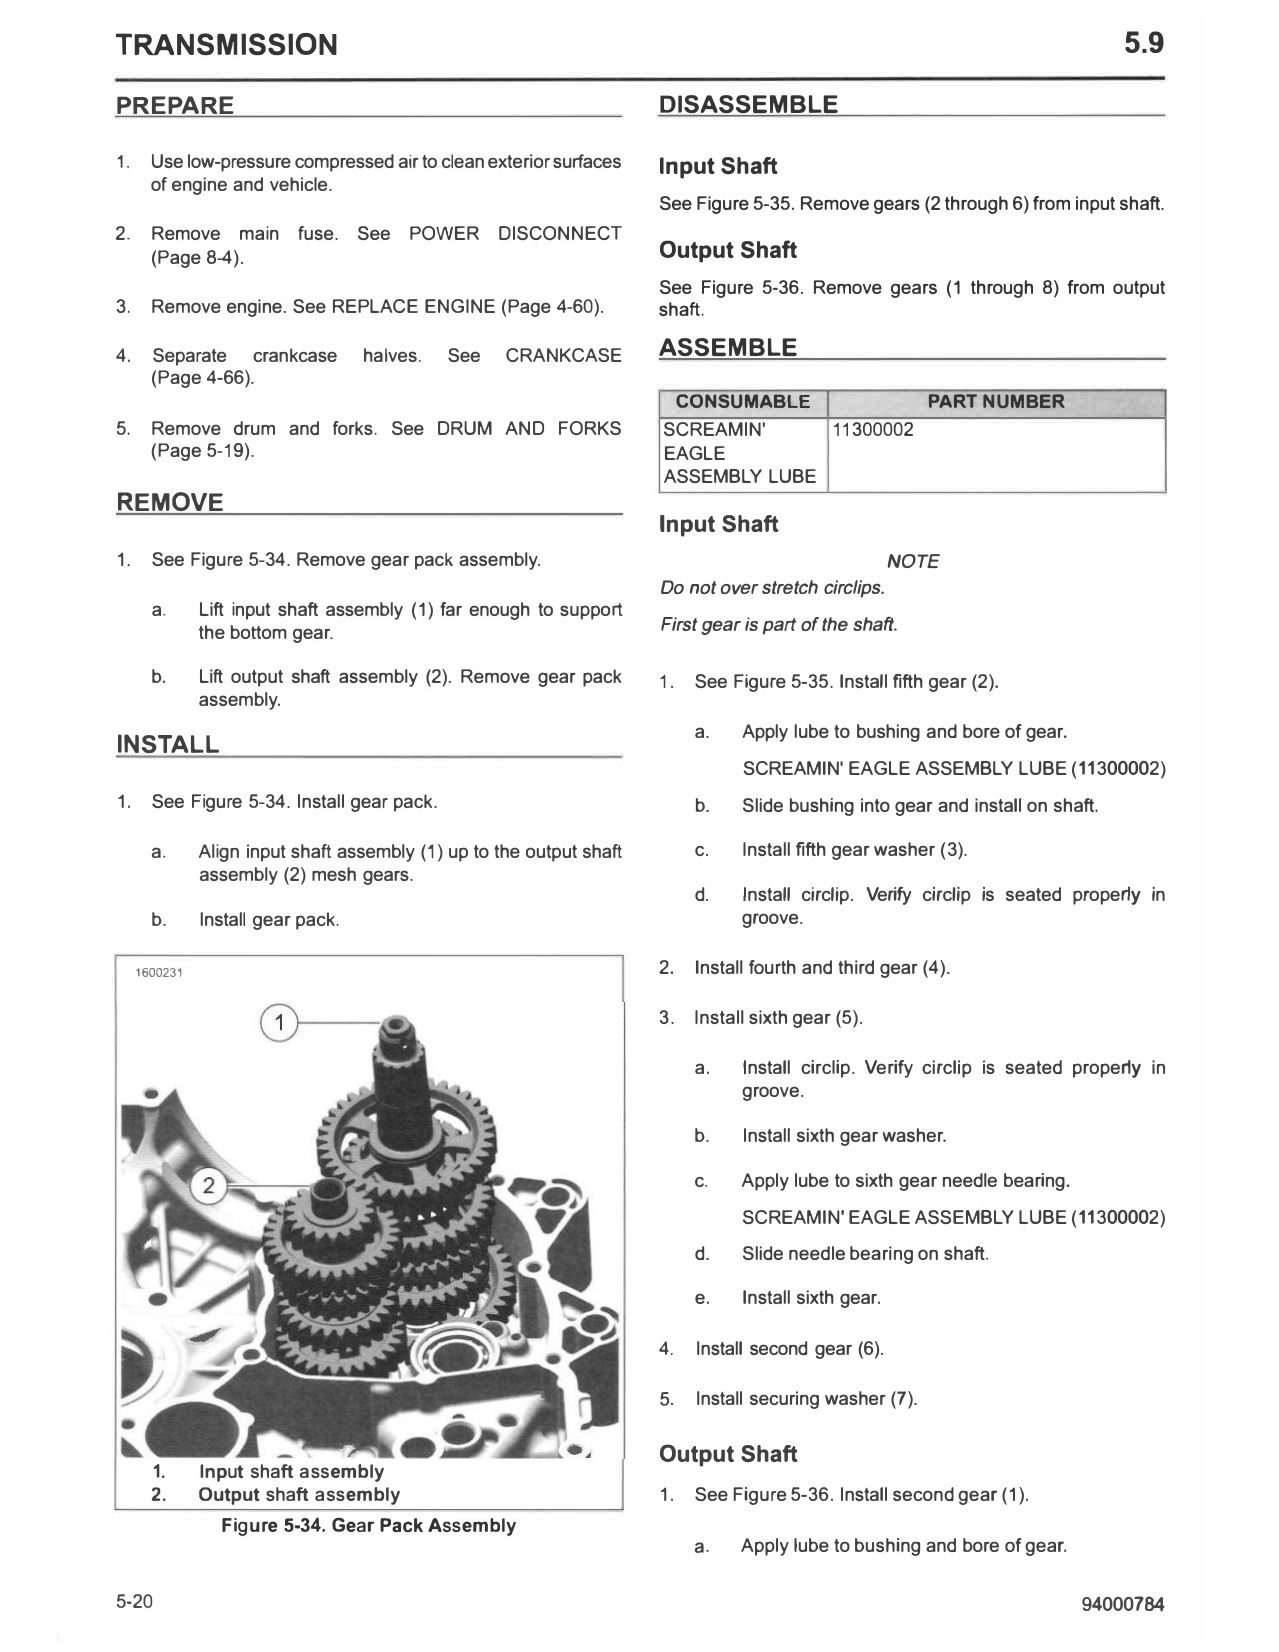
1.     See Figure 5-34. Remove gear pack assembly.                                                      NOTE
                                                                       Do not over stretch circlips.
       a.      Lift input shaft assembly (1) far enough to support
               the bottom gear.                                        First gear is part of the shaft.

       b.      Lift output shaft assembly (2). Remove gear pack        1.   See Figure 5-35. Install fifth gear (2).
               assembly.
                                                                            a.    Apply lube to bushing and bore of gear.
INSTALL
                                                                                  SCREAMIN' EAGLE ASSEMBLY LUBE (11300002)
1.     See Figure 5-34. Install gear pack.                                  b.    Slide bushing into gear and install on shaft.

       a.      Align input shaft assembly (1) up to the output shaft        c.    Install fifth gear washer (3).
               assembly (2) mesh gears.
                                                                            d.    Install circlip. Verify circlip is seated property in
       b.      Install gear pack.                                                 groove.

     1600231                                                           2.   Install fourth and third gear (4).

                                                                       3.   Install sixth gear (5).

                                                                            a.    Install circlip. Verify circlip is seated properly in
                                                                                  groove.

                                                                            b.    Install sixth gear washer.

                                                                            c.    Apply lube to sixth gear needle bearing.
                                                                                  SCREAMIN' EAGLE ASSEMBLY LUBE (11300002)
                                                                            d.    Slide needle bearing on shaft.

                                                                            e.    Install sixth gear.

                                                                       4.   Install second gear (6).

                                                                       5.   Install securing washer (7).

                                                                       Output Shaft
       1.      Input shaft assembly
       2.      Output shaft assembly                                   1.   See Figure 5-36. Install second gear (1 ).
                 Figure 5-34. Gear Pack Assembly
                                                                            a.    Apply lube to bushing and bore of gear.

5-20                                                                                                                         94000784
               SCREAMIN' EAGLE ASSEMBLY LUBE (11300002)                   4.        Install fourth gear (5).

       b.      Slide bushing into gear.                                             a.     Apply lube to fourth gear needle bearing.
       C.      Identify chamfer on gear.                                                   SCREAMIN' EAGLE ASSEMBLY LUBE (11300002)

       d.      Install gear and bushing with chamfer facing the next                b.     Slide needle bearing on shaft.
               gear being installed.
                                                                                    C.     Install fourth gear on shaft.
       e.      Install washer (2).
                                                                                    d.     Install washer.
       f.      Install circlip with sharp side facing out.
                                                                                    e.     Install circlip with sharp edge facing away from gear
      g.       Verify circlip is in groove.                                                being installed. Verify circlip is seated properly in
                                                                                           groove.
2.     Install sixth gear (3).
                                                                          5.        Install fifth gear (6).
3.    Install third gear (4).
                                                                          6.        Install first gear (8).
       a.      Install circlip with sharp edge facing away from gear
               being installed.                                                     a.     Install washer.

      b.       Verify circlip is in groove.                                         b.     Apply lube to bushing and bore of gear.

                                                                                           SCREAMIN' EAGLE ASSEMBLY LUBE (11300002)
      c.       Install washer
                                                                                    c.     Identify chamfer on gear.
      d.       Apply lube to third gear needle bearing.
                                                                                    d.    Install gear and bushing with chamfer facing away
               SCREAMIN' EAGLE ASSEMBLY LUBE (11300002)
                                                                                          from other gears.
      e.       Slide needle bearing on shaft.
                                                                          7.        Install keeper washer.
      f.       Install third gear on shaft.

     sm07754

                                      /
                                          ,,..._   --- ---                                                                 ---

                                                                                                               ---   /

       1.      Restrictor plug                                                 5.        Sixth gear (30 teeth)
       2.      Fifth gear (28 teeth)                                           6.        Second gear (18 teeth)
       3.      Washer (25 mm 10)                                               7.        Washer (20.4 mm 10, 1.6 mm thick)
       4.      Fourth (25 teeth)/Third (22 teeth) gear
                                                             Figure 5-35. Input Shaft

                                                                                                           2

        '60�                                                                                                       /
                                                                                                                       /
                                                                                                                           /

                                               �

           Second gea, (38 teeth)                                                   Fifth g e ar (3 1 teeth)
     .                                                                   6.
   2.
   1       Washe, (25 mm ID)                                                        Was her (2           ID)
                                                                                       sl gea, (4mm
                                                                                                 7
   3.      Sixth g e a, (29 teeth)                                              7.
                                                                                8.  fl,             0 le eth)
   4       Thid   g e a r (3 6 t e eth)                                         9.  Washe, (25 4 mm ID 1 6 mm thick)
     .         r                                                                                  .           ' ·_
           Fourth�� 9 �e a�r_f3�3�t�e:!:_                                                                          ____
 _ 5_.                                   �h�)___                                                                _      _
                                      et
                                                   _
                                                       IFFiigguunre 5-3 6. 0 utputShaft
                                                                                                                         -
COMPLETEL______                                                               2 As semble crankcase hal,es. See CRANKCASE
                                                                               • (Page 4-66).
 .     Install drum and forks. See DRUM- A. ",N''no FORKS
1      (Page5-19).                                                  3.                   • e • See REPLACE ENGi NE (Page 4-60).
                                                                              Install engin

                                                                    4         Install main   fuse.   See   POWER     DISCONNECT
                                                                     •        (Page 8-4).