4.8 Troubleshooting
Fragment manuala — str. 216–219
📋 Tekst do skopiowania (OCR/wyszukiwanie)
TROUBLESHOOTING 4.8
TYPICAL SYMPTOMS 10. Connect compression tester to front cylinder following
manufacturer's instructions.
Symptoms indicating a need for engine repair are often
misleading. If more than one symptom is present, possible 11. Hold the throttle open by the linkage on the ECM side of
causes can be narrowed to make at least a partial diagnosis. the throttle body.
For example, an above normal consumption of oil could be 12. Press start button, engine will crank for 10 seconds.
caused by several mechanical faults. However when
accompanied by blue-gray smoke from the exhaust and low
13. Note gauge readings at the end of the first and last
compression, it indicates the rings need replacing. Low
compression strokes. Record test results.
compression by itself is more likely to be caused by improperly
seated or burned valves, not worn rings.
14. Repeat on rear cylinder.
Certain knocking noises may occur because of loose bearings,
others by piston slap. Piston slap is a condition where piston 15. Compare with specifications.
or cylinder or both are out of tolerance. This excessive
clearance allows the piston to slap the cylinder as it moves up If readings do not meet specifications, inject engine
a.
and down. oil into each cylinder and repeat the compression
Most frequently, valves, rings, pins, bushings and bearings tests on both cylinders. Readings that are
need attention at about the same time. If the symptoms indicate considerably higher during the second test indicate
that any one of the above components is worn, service all worn piston rings.
related parts. Volume: 0.5 fl oz (15 ml)
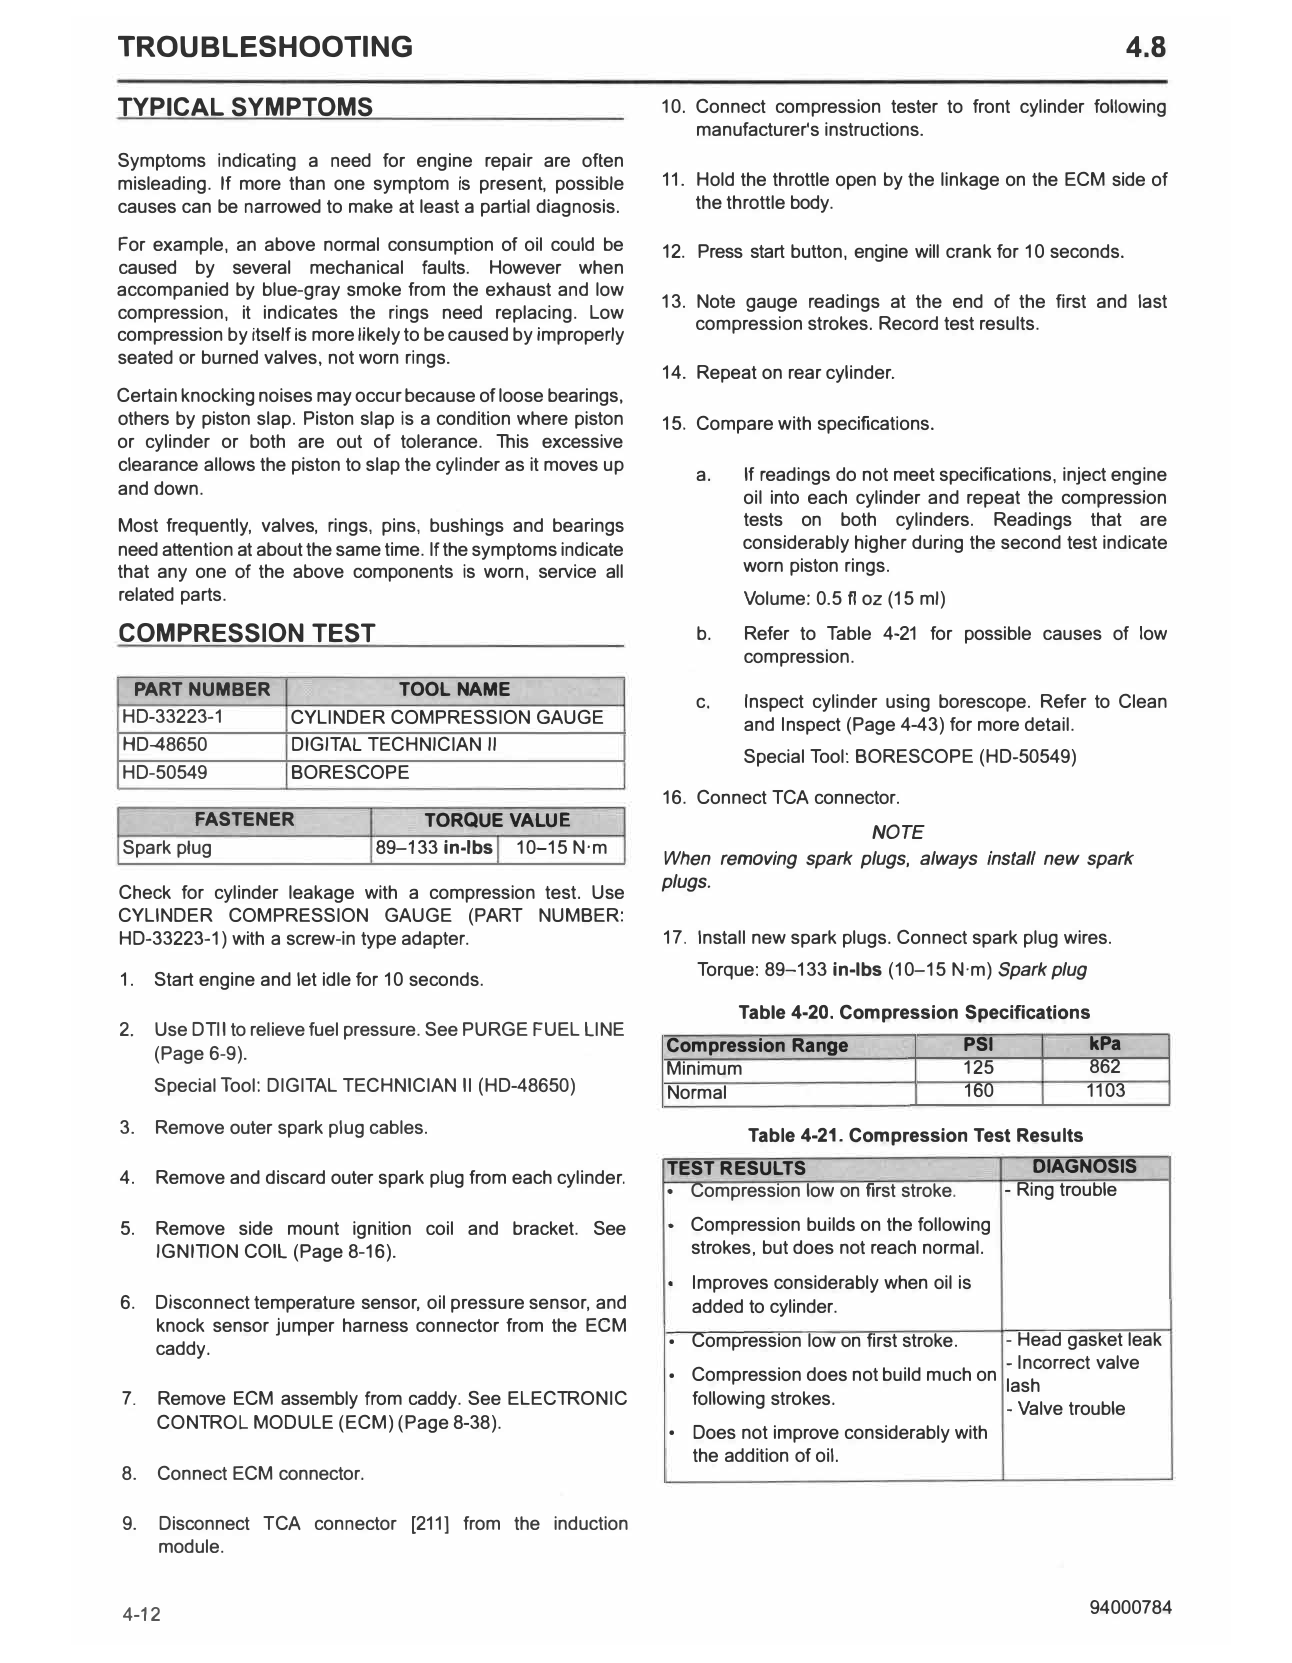
COMPRESSION TEST b. Refer to Table 4-21 for possible causes of low
compression.
PART NUMBER TOOL NAME
c. Inspect cylinder using borescope. Refer to Clean
HD-33223-1 CYLINDER COMPRESSION GAUGE and Inspect (Page 4-43) for more detail.
HD-48650 DIGITAL TECHNICIAN II
Special Tool: BORESCOPE (HD-50549)
HD-50549 BORESCOPE
16. Connect TCA connector.
FASTENER TORQUE VALUE
NOTE
Spark plug 89-133 in-lbs 10-15 N·m
When removing spark plugs, always install new spark
plugs.
Check for cylinder leakage with a compression test. Use
CYLINDER COMPRESSION GAUGE (PART NUMBER:
HD-33223-1) with a screw-in type adapter. 17. Install new spark plugs. Connect spark plug wires.
Torque: 89-133 in-lbs (10-15 N·m) Spark plug
1. Start engine and let idle for 10 seconds.
Table 4-20. Compression Specifications
2. Use DTII to relieve fuel pressure. See PURGE FUEL LINE
Compression Range PSI kPa
(Page 6-9).
Minimum 125 862
Special Tool: DIGITAL TECHNICIAN II (HD-48650) Normal 160 1103
3. Remove outer spark plug cables. Table 4-21. Compression Test Results
4. Remove and discard outer spark plug from each cylinder.
.
TEST RESULTS DIAGNOSIS
- Ring trouble
.
Compression low on first stroke.
5. Remove side mount ignition coil and bracket. See Compression builds on the following
strokes, but does not reach normal.
.
IGNITION COIL (Page 8-16).
Improves considerably when oil is
6. Disconnect temperature sensor, oil pressure sensor, and added to cylinder.
knock sensor jumper harness connector from the ECM
. - Head gasket leak
.
caddy. Compression low on first stroke.
- Incorrect valve
Compression does not build much on
lash
.
7. Remove ECM assembly from caddy. See ELECTRONIC following strokes.
- Valve trouble
CONTROL MODULE (ECM) (Page 8-38).
Does not improve considerably with
the addition of oil.
8. Connect ECM connector.
9. Disconnect T CA connector [211] from the induction
module.
4-12 94000784
CYLINDER LEAKDOWN TEST 3. Check oil pressure. See Oil Pressure Check (Page 4-11 ).
PART NUMBER TOOLNAME 4. If oil pressure is outside of range, inspect following:
HD-35667-A CYLINDER LEAKDOWN T ESTER
a. Oil pump wear.
HD-50549 BORESCOPE
HD-52956 CRANKSHAFT LOCKING TOOL b. Crankcase passages for blockages.
1. Verify that the leakdown tester is free from leakage. c. Oil hoses for blockages.
Special Tool: CYLINDER LEAKDOWN T ESTER
(HD-35667-A) 5. If oil-starved hydraulic lash adjusters or cam chain
tensioners are suspected, remove hydraulic lash adjusters
a. Apply a soap/water solution around all tester fittings. or cam chain tensioners and inspect. See CAMSHAFTS
AND PHASERS (Page 4-38) and CAMSHAFT SPROCKET
b. Connect cylinder leakdown tester to compressed air AND TIMING CHAIN (Page 4-24).
source.
a. Clean hydraulic lash adjuster and cam chain
c. Bubbles indicate leakage.
tensioner bore of all foreign material.
2. Remove one spark plug per cylinder.
6. Inspect hydraulic lash adjusters or cam chain tensioners
bore for improper fit and unusual wear.
3. Install crankshaft locking tool. See CRANKSHAFT
LOCKOUT (Page 4-18).
7. Visually inspect camshaft lobes for abnormal wear.
Special Tool: CRANKSHAFT LOCKING TOOL (HD-52956)
8. Check top end components.
4. Follow the manufacturer's instructions to perform the
leakdown test.
a. Check for excess roller finger follower wheel or
Record the percent of leakage. bearing wear.
a.
b. Inspect valve stems for scuffing. Check stem to guide
b. Listen for air leaks at throttle body, exhaust pipe, oil
clearance.
fill spout and head gasket.
c. Check for loose valve seats or signs of shifting.
5. Results:
9. Grind valves and valve seats. See CYLINDER HEADS
a. Leakage greater than 25 percent indicates that (Page 4-34).
further diagnosis is warranted.
b. Air escaping through the throttle body indicates DIAGNOSE SMOKING ENGINE OR HIGH OIL
leaking past intake valves. CONSUMPTION
c. Air escaping through the exhaust pipe indicates Perform both a compression test and a cylinder leakage test.
leaking past exhaust valves. See Compression Test (Page 4-12) and Cylinder Leakdown
Test (Page 4-13). If further testing is needed, inspect for the
d. Air sound from the oil fill spout indicates leaking past following:
piston rings.
Check Before Cylinder Head Removal:
e. Inspect cylinder using borescope. See Clean and
Inspect (Page 4-43). 1. Oil level too high.
Special Tool: BORESCOPE (HD-50549)
2. Oil carryover.
6. Remove crankshaft locking tool. See CRANKSHAFT
LOCKOUT (Page 4-18). 3. Restricted breather hose.
DIAGNOSE VALVE TRAIN NOISE 4. Restricted oil filter.
NOTE Check After Cylinder Head Removal:
Some valve train noise at start-up is normal until hydraulic lash
adjusters and cam chain tensioners fill with oil. Continuous 1. Clogged oil return passages.
abnormal noise requires diagnosis.
2. Valve guide seals.
1. Check oil level and condition.
3. Valve guide to valve stem clearance.
2. With engine and oil at normal operating temperature, check
oil pressure at 1500 and 4000 rpm. 4. Gasket surfaces of head and cylinder.
94000784 4-13
5. Cylinder head casting porosity allowing oil to drain into b. Verify that the piston ring gaps are properly
combustion chamber. staggered.
6. If the above checks do not reveal the cause: C. Inspect for excess piston ring wear.
a. Remove the cylinder. TROUBLESHOOTING TABLES
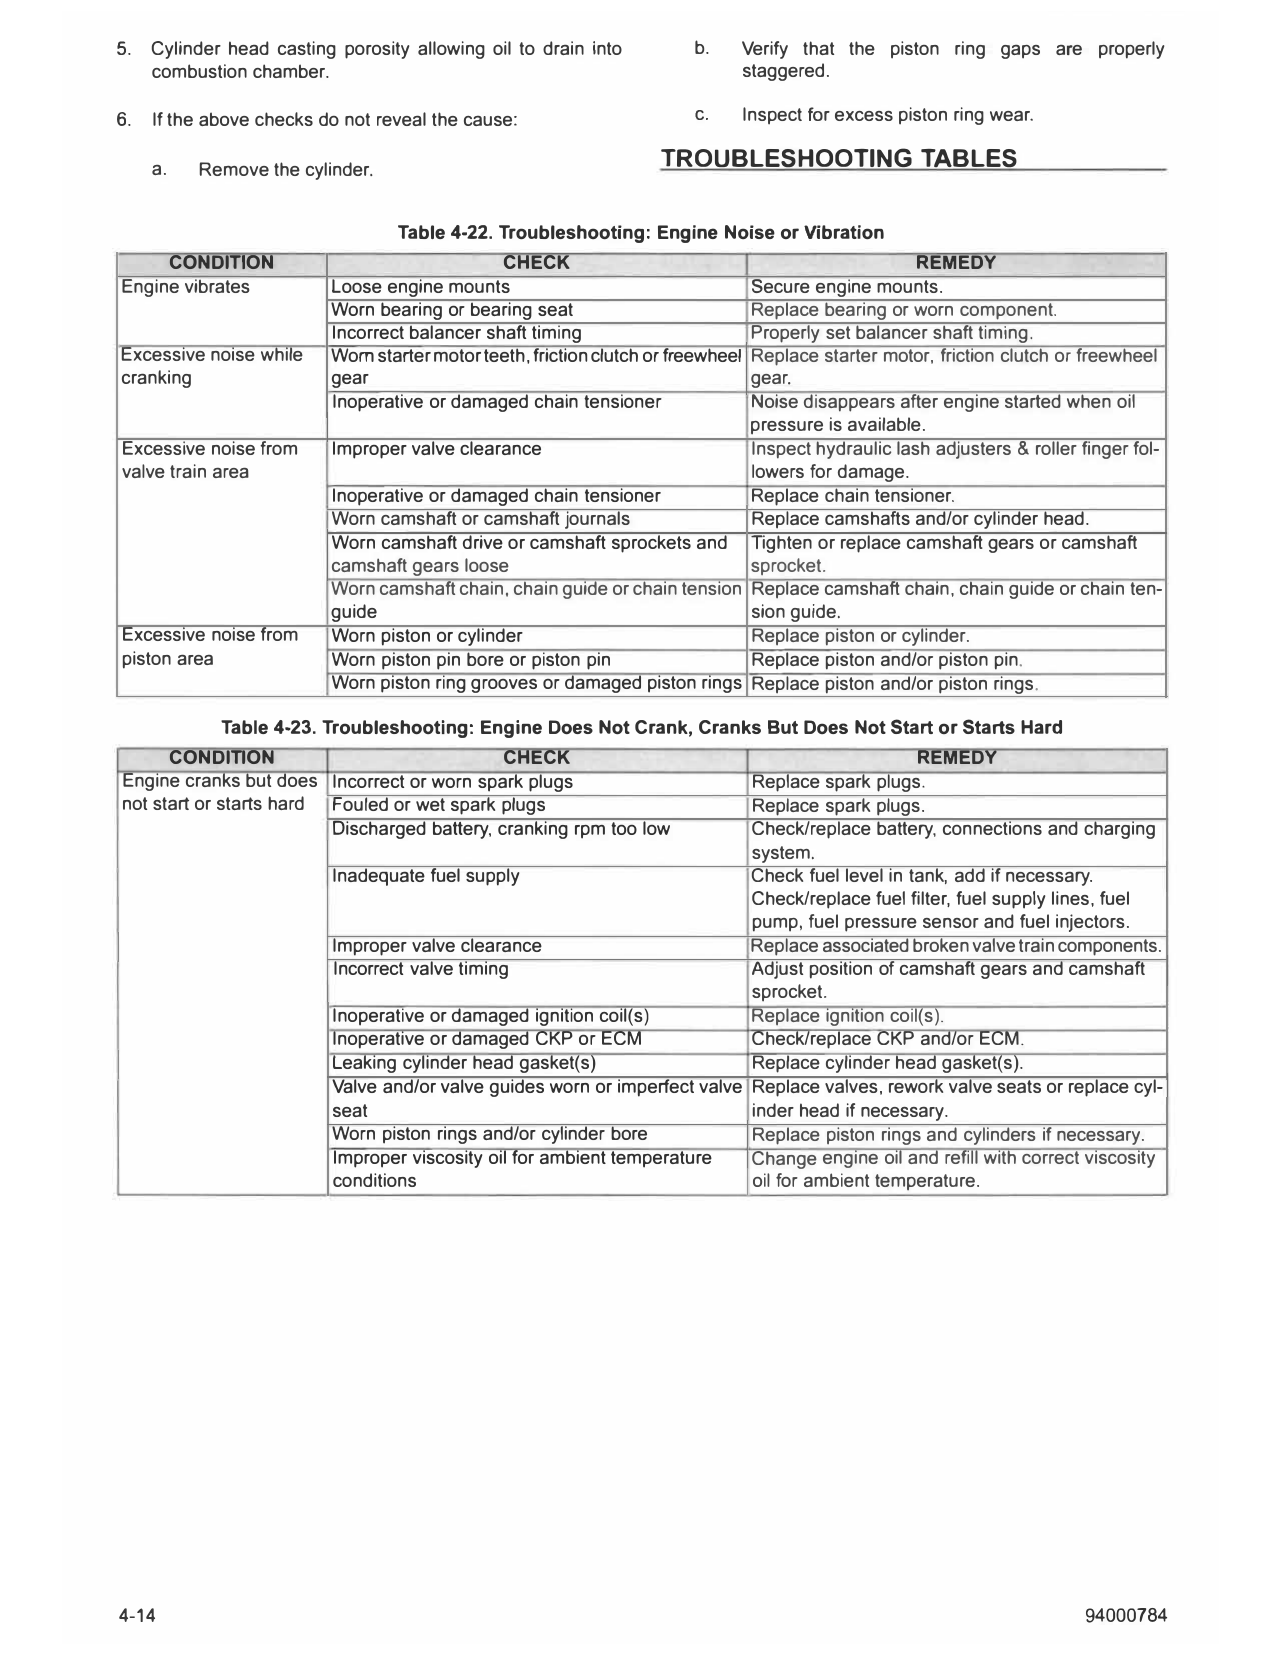
Table 4-22. Troubleshooting: Engine Noise or Vibration
CONDITION CHECK REMEDY
Engine vibrates Loose engine mounts Secure engine mounts.
Worn bearing or bearing seat Replace bearing or worn component.
Incorrect balancer shaft timing Properly set balancer shaft timing.
Excessive noise while Worn starter motor teeth, friction clutch or freewheel Replace starter motor, friction clutch or freewheel
cranking gear gear.
Inoperative or damaged chain tensioner Noise disappears after engine started when oil
pressure is available.
Excessive noise from Improper valve clearance Inspect hydraulic lash adjusters & roller finger fol-
valve train area lowers for damage.
Inoperative or damaged chain tensioner Replace chain tensioner.
Worn camshaft or camshaft journals Replace camshafts and/or cylinder head.
Worn camshaft drive or camshaft sprockets and Tighten or replace camshaft gears or camshaft
camshaft gears loose sprocket.
Worn camshaft chain, chain guide or chain tension Replace camshaft chain, chain guide or chain ten-
guide sion guide.
Excessive noise from Worn piston or cylinder Replace piston or cylinder.
piston area Worn piston pin bore or piston pin Replace piston and/or piston pin.
Worn piston ring grooves or damaged piston rings Replace piston and/or piston rings.
Table 4-23. Troubleshooting: Engine Does Not Crank, Cranks But Does Not Start or Starts Hard
CONDITION CHECK REMEDY
Engine cranks but does Incorrect or worn spark plugs Replace spark plugs.
not start or starts hard Fouled or wet spark plugs Replace spark plugs.
Discharged battery, cranking rpm too low Check/replace battery, connections and charging
system.
Inadequate fuel supply Check fuel level in tank, add if necessary.
Check/replace fuel filter, fuel supply lines, fuel
pump, fuel pressure sensor and fuel injectors.
Improper valve clearance Replace associated broken valve train components.
Incorrect valve timing Adjust position of camshaft gears and camshaft
sprocket.
Inoperative or damaged ignition coil(s) Replace ignition coil(s).
Inoperative or damaged CKP or ECM Check/replace CKP and/or ECM.
Leaking cylinder head gasket(s) Replace cylinder head gasket(s).
Valve and/or valve guides worn or imperfect valve Replace valves, rework valve seats or replace cyl-
seat inder head if necessary.
Worn piston rings and/or cylinder bore Replace piston rings and cylinders if necessary.
Improper viscosity oil for ambient temperature Change engine oil and refill with correct viscosity
conditions oil for ambient temperature.
4-14 94000784
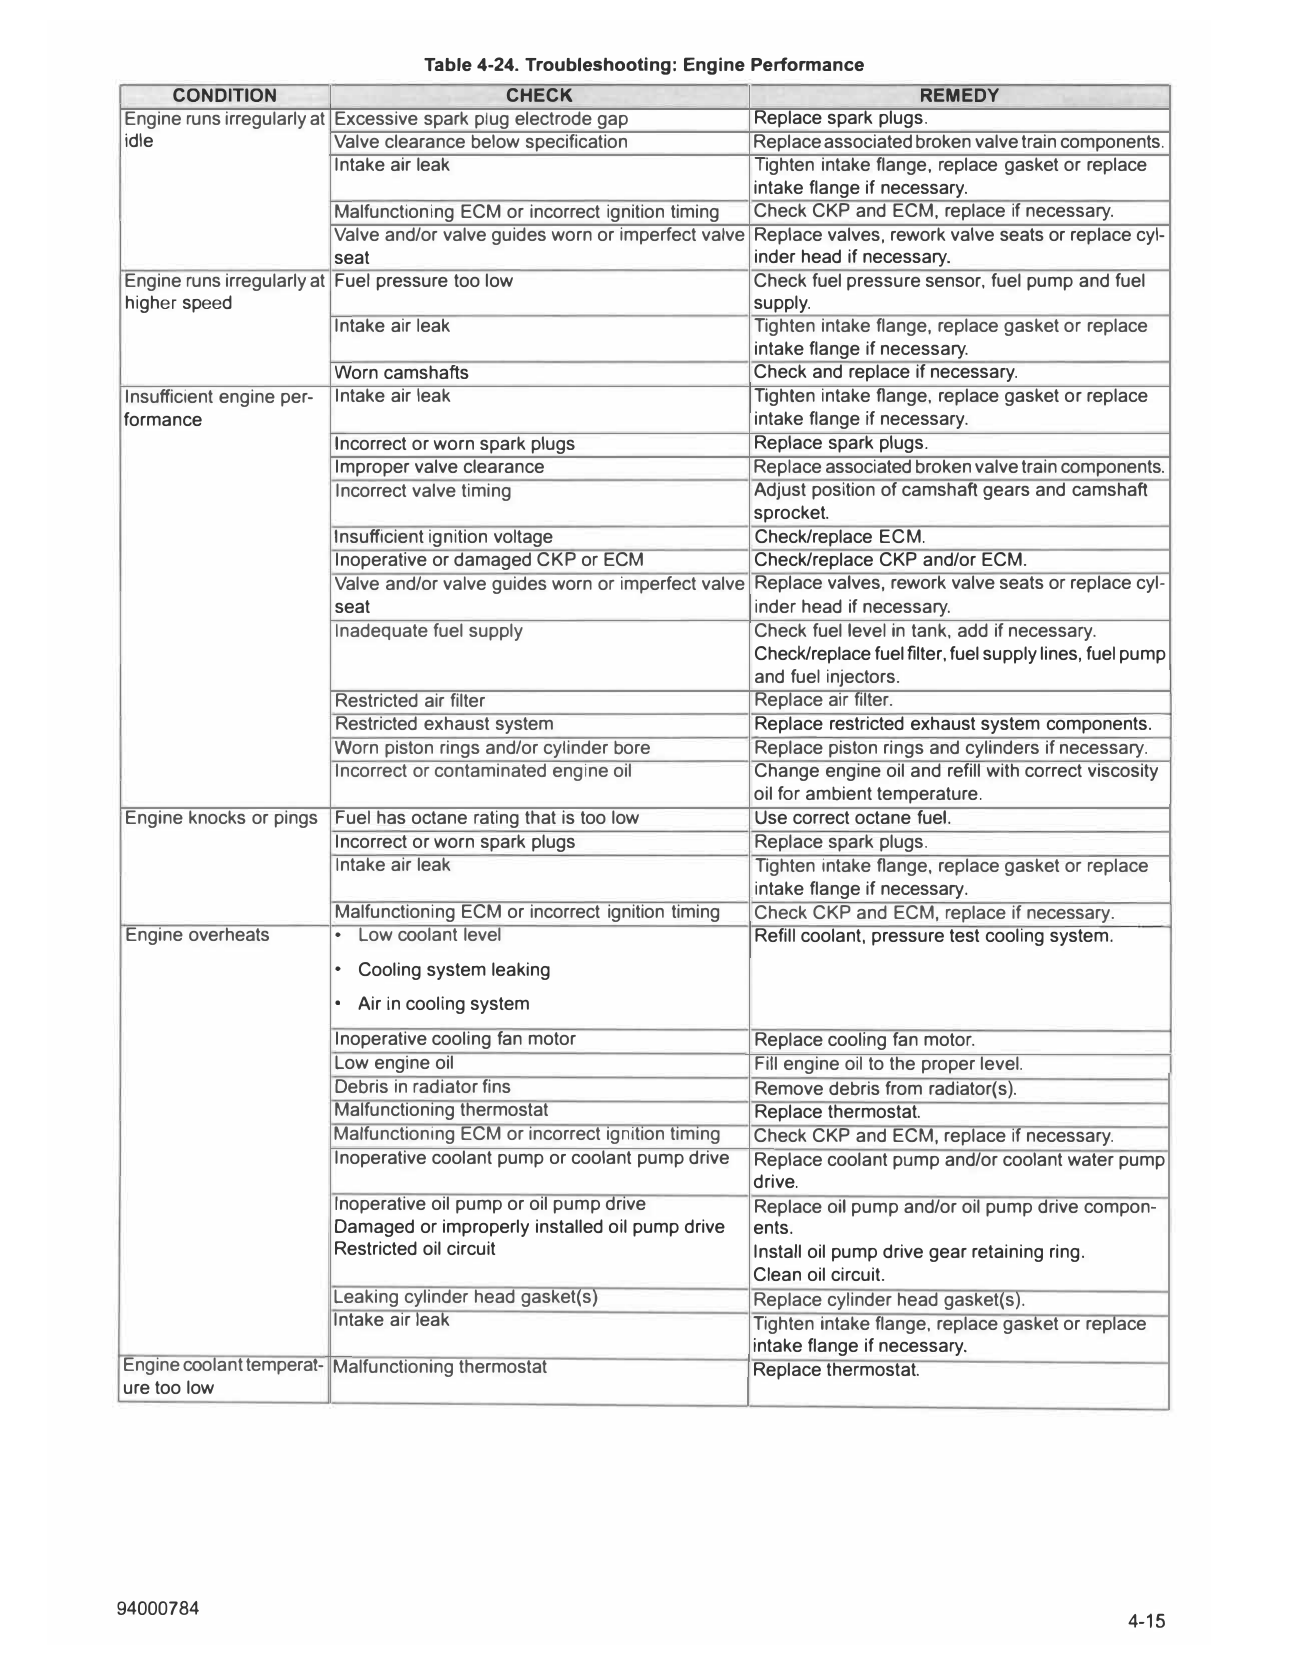
Table 4-24. Troubleshooting: Engine Performance
CONDITION CHECK REMEDY
Engine runs irregularly at Excessive spark plug electrode gap Replace spark plugs.
idle Valve clearance below specification Replace associated broken valve train components.
Intake air leak Tighten intake flange, replace gasket or replace
intake flange if necessary.
Malfunctioning ECM or incorrect ignition timing Check CKP and ECM, replace if necessary.
Valve and/or valve guides worn or imperfect valve Replace valves, rework valve seats or replace cyl-
seat inder head if necessary.
Engine runs irregularly at Fuel pressure too low Check fuel pressure sensor, fuel pump and fuel
higher speed supply.
Intake air leak Tighten intake flange, replace gasket or replace
intake flange if necessary.
Worn camshafts Check and replace if necessary.
Insufficient engine per- Intake air leak Tighlen intake flange, replace gasket or replace
formance intake flange if necessary.
Incorrect or worn spark plugs Replace spark plugs.
Improper valve clearance Replace associated broken valve train components.
Incorrect valve timing Adjust position of camshaft gears and camshaft
sprocket.
Insufficient ignition voltage Check/replace ECM.
Inoperative or damaged CKP or ECM Check/replace CKP and/or ECM.
Valve and/or valve guides worn or imperfect valve Replace valves, rework valve seats or replace cyl-
seat inder head if necessary.
Inadequate fuel supply Check fuel level in tank, add if necessary.
Check/replace fuel filter, fuel supply lines, fuel pump
and fuel injectors.
Restricted air filter Replace air filter.
Restricted exhaust system Replace restricted exhaust system components.
Worn piston rings and/or cylinder bore Replace piston rings and cylinders if necessary .
Incorrect or contaminated engine oil Change engine oil and refill with correct viscosity
oil for ambient temperature.
Engine knocks or pings Fuel has octane rating that is too low Use correct octane fuel.
Incorrect or worn spark plugs Replace spark plugs.
Intake air leak Tighten intake flange, replace gasket or replace
intake flange if necessary.
.Malfunctioning ECM or incorrect ignition timing Check CKP and ECM, replace if necessary.
.
Engine overheats Low coolant level Refill coolant, pressure test cooling system.
.
Cooling system leaking
Air in cooling system
Inoperative cooling fan motor Replace cooling fan motor.
Low engine oil Fill engine oil to the proper level.
Debris in radiator fins Remove debris from radiator(s).
Malfunctioning thermostat Replace thermostat.
Malfunctioning ECM or incorrect ignition timing Check CKP and ECM, replace if necessary.
Inoperative coolant pump or coolant pump drive Replace coolant pump and/or coolant water pump
drive.
Inoperative oil pump or oil pump drive Replace oil pump and/or oil pump drive compon-
Damaged or improperly installed oil pump drive ents.
Restricted oil circuit Install oil pump drive gear retaining ring.
Clean oil circuit.
Leaking cylinder head gasket(s) Replace cylinder head gasket(s).
Intake air leak Tighten intake flange, replace gasket or replace
intake flange if necessary.
Engine coolant tempera!- Malfunctioning thermostat Replace thermostat.
ure too low