3.16 Rear Brake Master Cylinder
Fragment manuala — str. 112–115
📋 Tekst do skopiowania (OCR/wyszukiwanie)
REAR BRAKE MASTER CYLINDER 3.16
PREPARE 2. If replacing master cylinder: Install brake hose.
1. If replacing master cylinder: Drain brake fluid from rear a. Install brake reservoir hose (12).
brake system. See BLEED BRAKES (Page 3-49).
b. Move lower spring clamp (11) into position.
REMOVE
3. Install master cylinder.
NOTE
a. Align master cylinder (7) with brake pedal (9).
See Figure 3-36. Record position of brake line before removing.
b. Install clevis pin (8) through brake pedal and
1. See Figure 3-35.lf replacing master cylinder: Remove pushrod.
banjo bolt (3). Discard gasket washers (4).
c. Install new cotter pin (10).
2. Remove master cylinder.
d. Install master cylinder (7) in position.
a. Discard cotter pin (10).
e. Install mounting screws (5) with heel guard (6).
Tighten.
b. Remove clevis pin (8) from brake pedal (9).
Torque: 80-97 in-lbs (9-11 N·m) Brake, rear master
c. Remove screws (5), heel guard (6) and master cylinder screws
cylinder (7).
4. If replacing master cylinder: Attach brake line.
3. If replacing master cylinder: Remove brake hose.
a. Attach ABS module to rear brake master cylinder
line (2) to master cylinder (7) with banjo bolt (3) and
a. Reposition lower spring clamp (11).
new gasket washers (4).
b. Remove brake reservoir hose (12).
b. See Figure 3-36. Position brake line as shown.
4. If replacing master cylinder reservoir: Remove master c. Tighten banjo bolt.
cylinder reservoir.
Torque: 17-19 ft-lbs (23-26 N·m) Brake, rear master
a. Reposition upper spring clamp (13). cylinder banjo bolt
b. Remove brake reservoir hose (12).
c. Remove reservoir screw (1) and master cylinder
reservoir (14).
INSTALL
FASTENER TORQUE VALUE
Brake, rear master cylinder 17-19 ft-lbs 23-26 N·m
banjo bolt
Brake, rear master cylinder 62-80 in-lbs 7-9 N·m
reservoir screw
Brake, rear master cylinder 80-97 in-lbs 9-11 N·m
screws
1. See Figure 3-35. If replacing master cylinder reservoir:
Install master cylinder reservoir.
a. Install master cylinder reservoir (14).
b. Install reservoir screw (1). Tighten.
Torque: 62-80 in-lbs (7-9 N·m) Brake, rear master
cylinder reservoir screw
c. Install brake reservoir hose (12).
d. Move upper spring clamp (13) into position.
3-34 94000784
1. See Figure 3-37. Remove pedal connector.
a. Remove E-clip (13).
b. Remove pedal connector (12).
c. Remove nut (11).
2. Remove dust boot (10).
3. Remove return spring.
a. Remove flat washer (9).
b. Push and hold return spring (7).
c. Remove E-clip (8).
d. Release return spring tension and remove return
spring.
4. Remove pushrod.
a. Push and hold end of pushrod (4).
b. Discard retaining ring (6).
c. Remove pushrod with special washer (5).
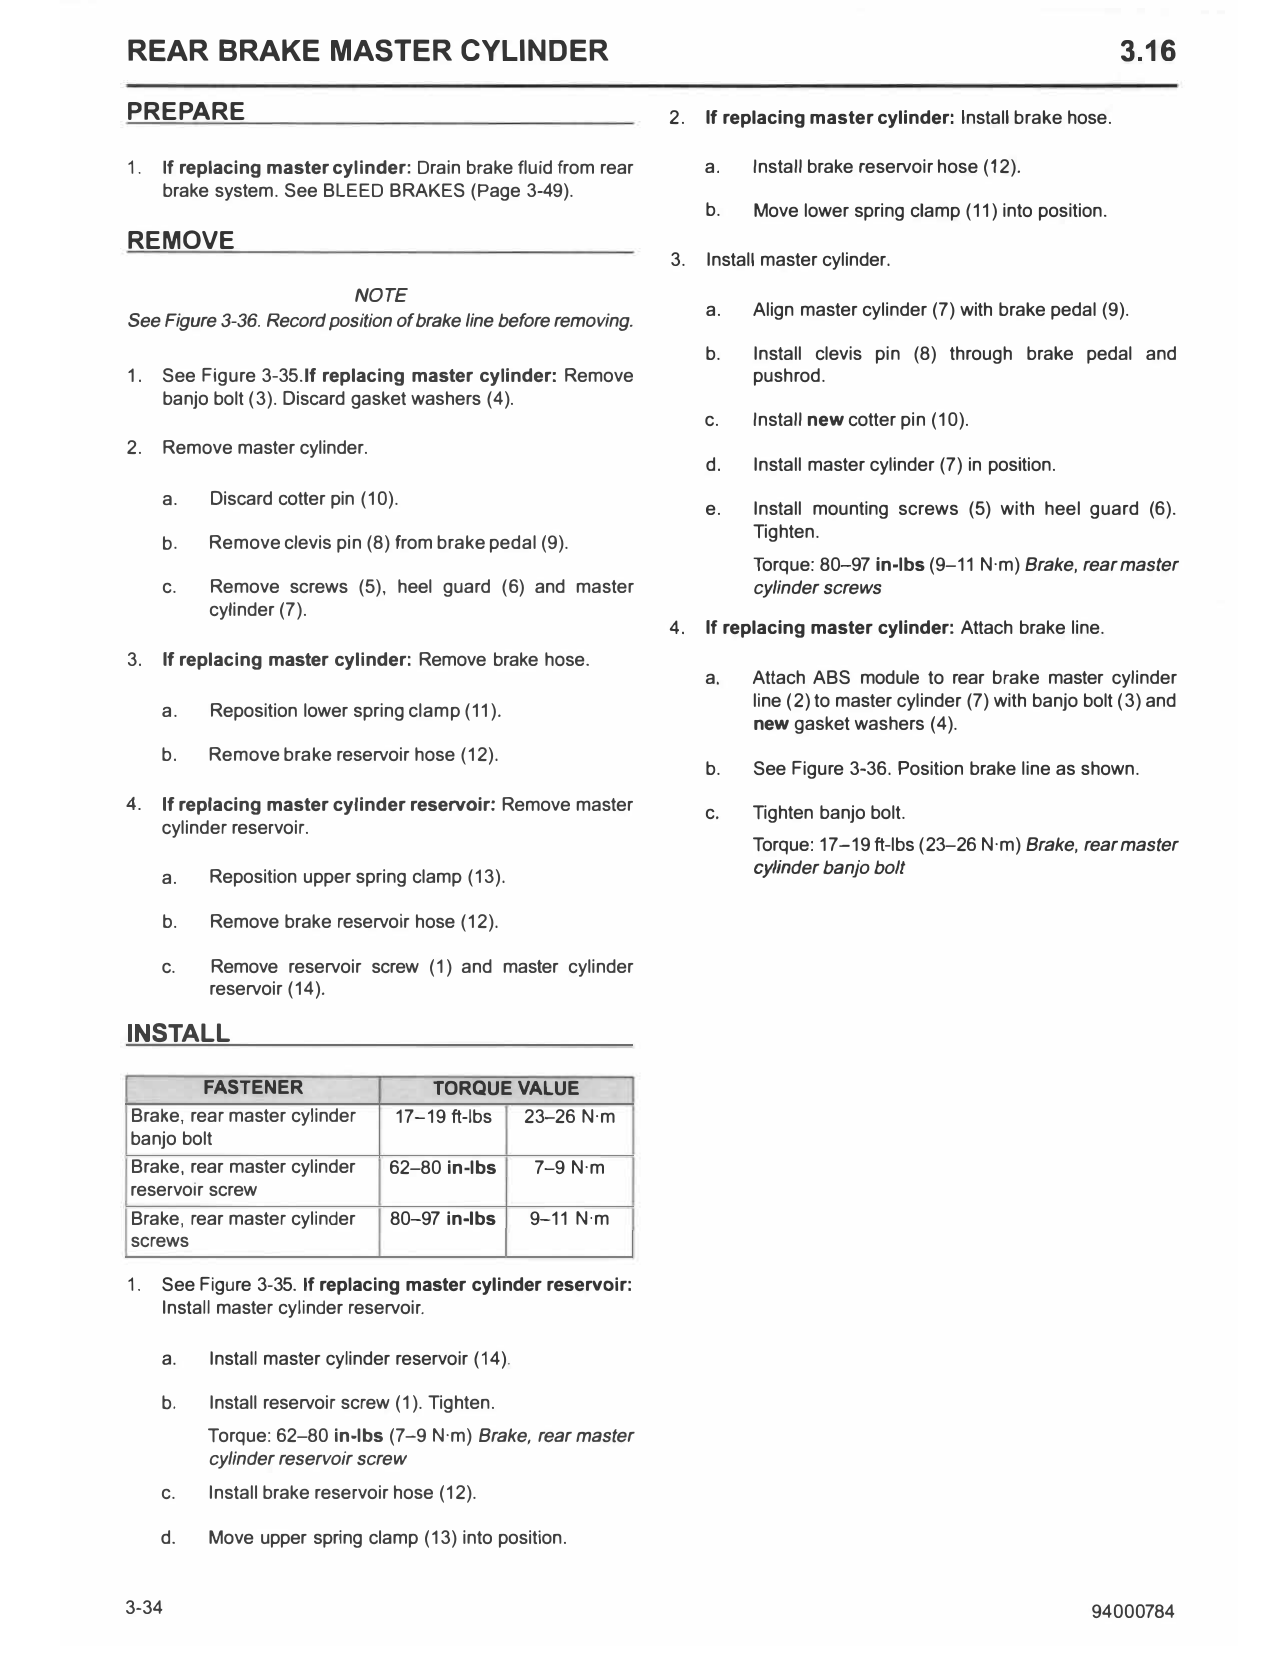
1. Reservoir screw
2. ABS module to rear brake master cylinder line 5. Pull piston assembly from piston bore.
3. Banjo bolt
4. Gasket washer (2) 6. Discard spigot (1).
5. Mounting screws
6. Heel guard
7. Master cylinder CLEAN AND INSPECT
8. Clevis pin
9. Brake pedal A WARNING
10. Cotter pin
Use denatured alcohol to clean brake system components.
11. Lower spring clamp
Do not use mineral-based solvents (such as gasoline or
12. Brake reservoir hose
paint thinner), which will deteriorate rubber parts even
13. Upper spring clamp
after assembly. Deterioration of these components can
14. Master cylinder reservoir
cause brake failure, which could result in death or serious
Figure 3-35. Rear Brake Master Cylinder injury. (00291a)
1. Clean all parts with denatured alcohol.
2. Inspect parts for wear or damage. Replace or repair as
necessary.
a. Inspect rear brake master cylinder for leaks.
b. Inspect rubber boot for wear or damage.
ASSEMBLE
FASTENER TORQUE VALUE
Pedal connector nut 93-111 in-lbs 10.5-12.5 N·m
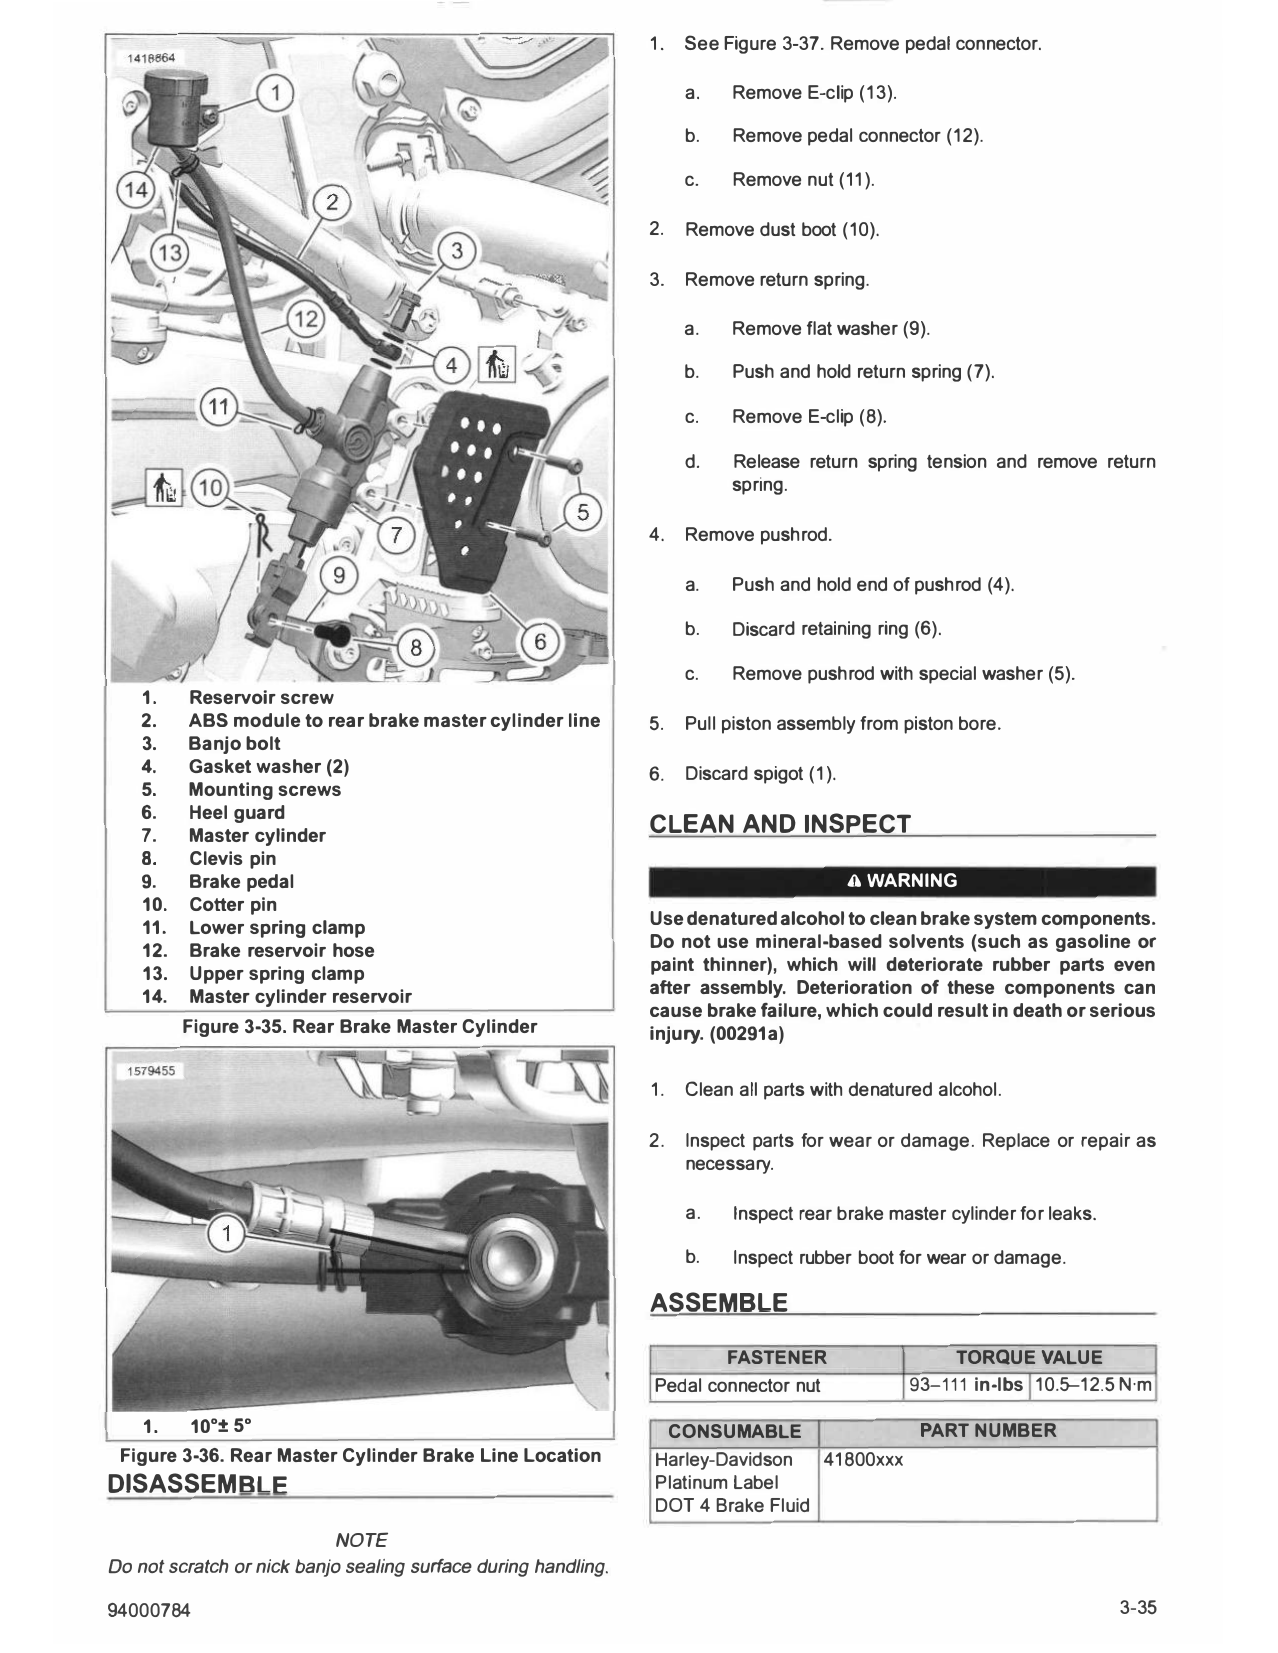
1. 10 °:t 5° CONSUMABLE PART NUMBER
Figure 3-36. Rear Master Cylinder Brake Line Location Harley-Davidson 41800xxx
DISASSEMBLE Platinum Label
DOT 4 Brake Fluid
NOTE
Do not scratch or nick banjo sealing surface during handling.
94000784 3-35
1. Lightly lubricate piston bore and OD of piston seals with
1454812
brake fluid.
Consumable: Harley-Davidson Platinum Label DOT 4
Brake Fluid (41800xxx)
2. See Figure 3-37. Press new spigot (1) assembly into
master cylinder body (2).
3. Insert piston assembly (3) into piston bore.
4. Slide special washer (5), with collar facing outer end of
pushrod (4), and new retaining ring (6) over pushrod.
5. Install retaining ring.
a. Hold piston assembly in with pushrod.
b. Install retaining ring in groove.
c. Verify retaining ring is seated.
6. Install pedal return spring.
a. Seat return spring (7) on retaining ring.
b. Compress return spring and install E-clip (8) in
inboard groove of pushrod.
c. Slide flat washer (9) over pushrod.
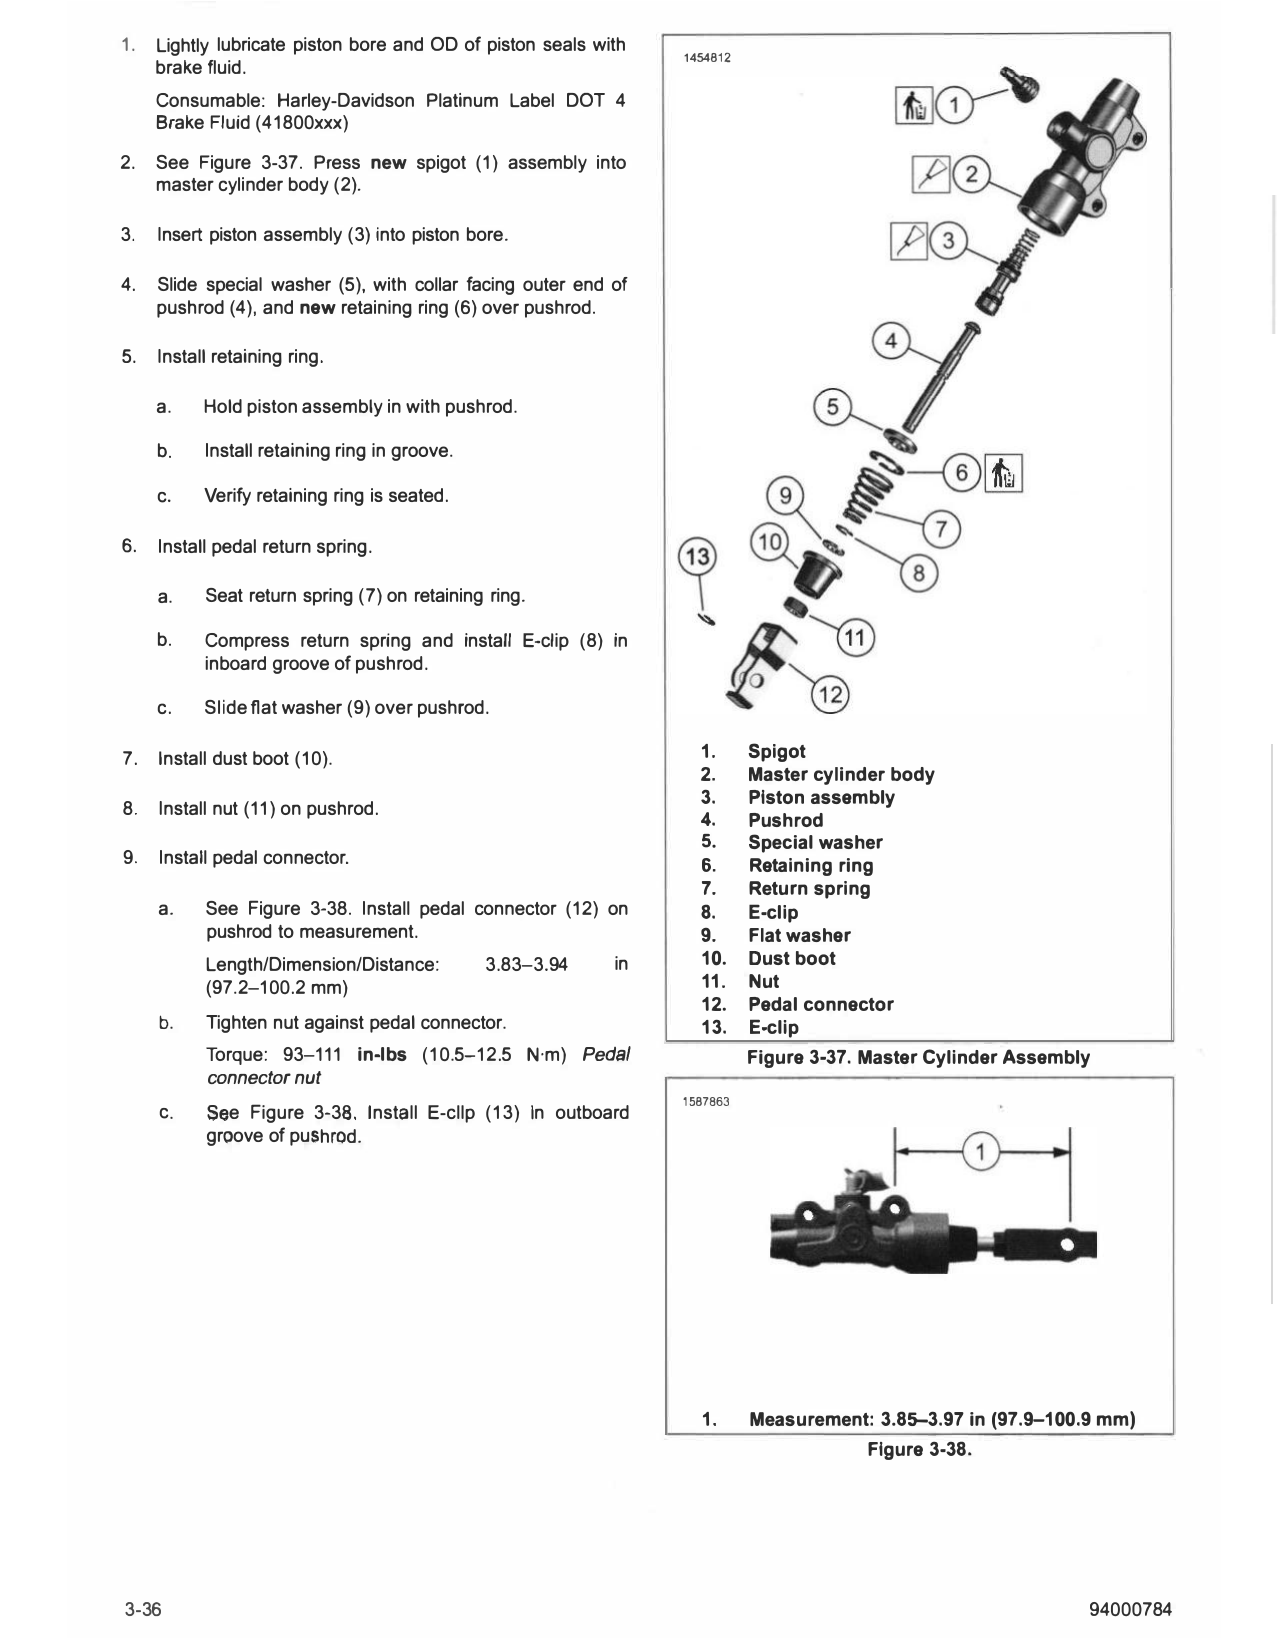
7. Install dust boot (10). 1. Spigot
2. Master cylinder body
3. Piston assembly
8. Install nut (11) on pushrod.
4. Pushrod
5. Special washer
9. Install pedal connector. 6. Retaining ring
7. Return spring
a. See Figure 3-38. Install pedal connector (12) on 8. E-clip
pushrod to measurement. 9. Flat washer
Length/Dimension/Distance: 3.83-3.94 in 10. Dust boot
(97.2-100.2 mm) 11. Nut
12. Pedal connector
b. Tighten nut against pedal connector. 13. E-clip
Torque: 93-111 in-lbs (10.5-12.5 N·m) Pedal Figure 3-37. Master Cylinder Assembly
connector nut
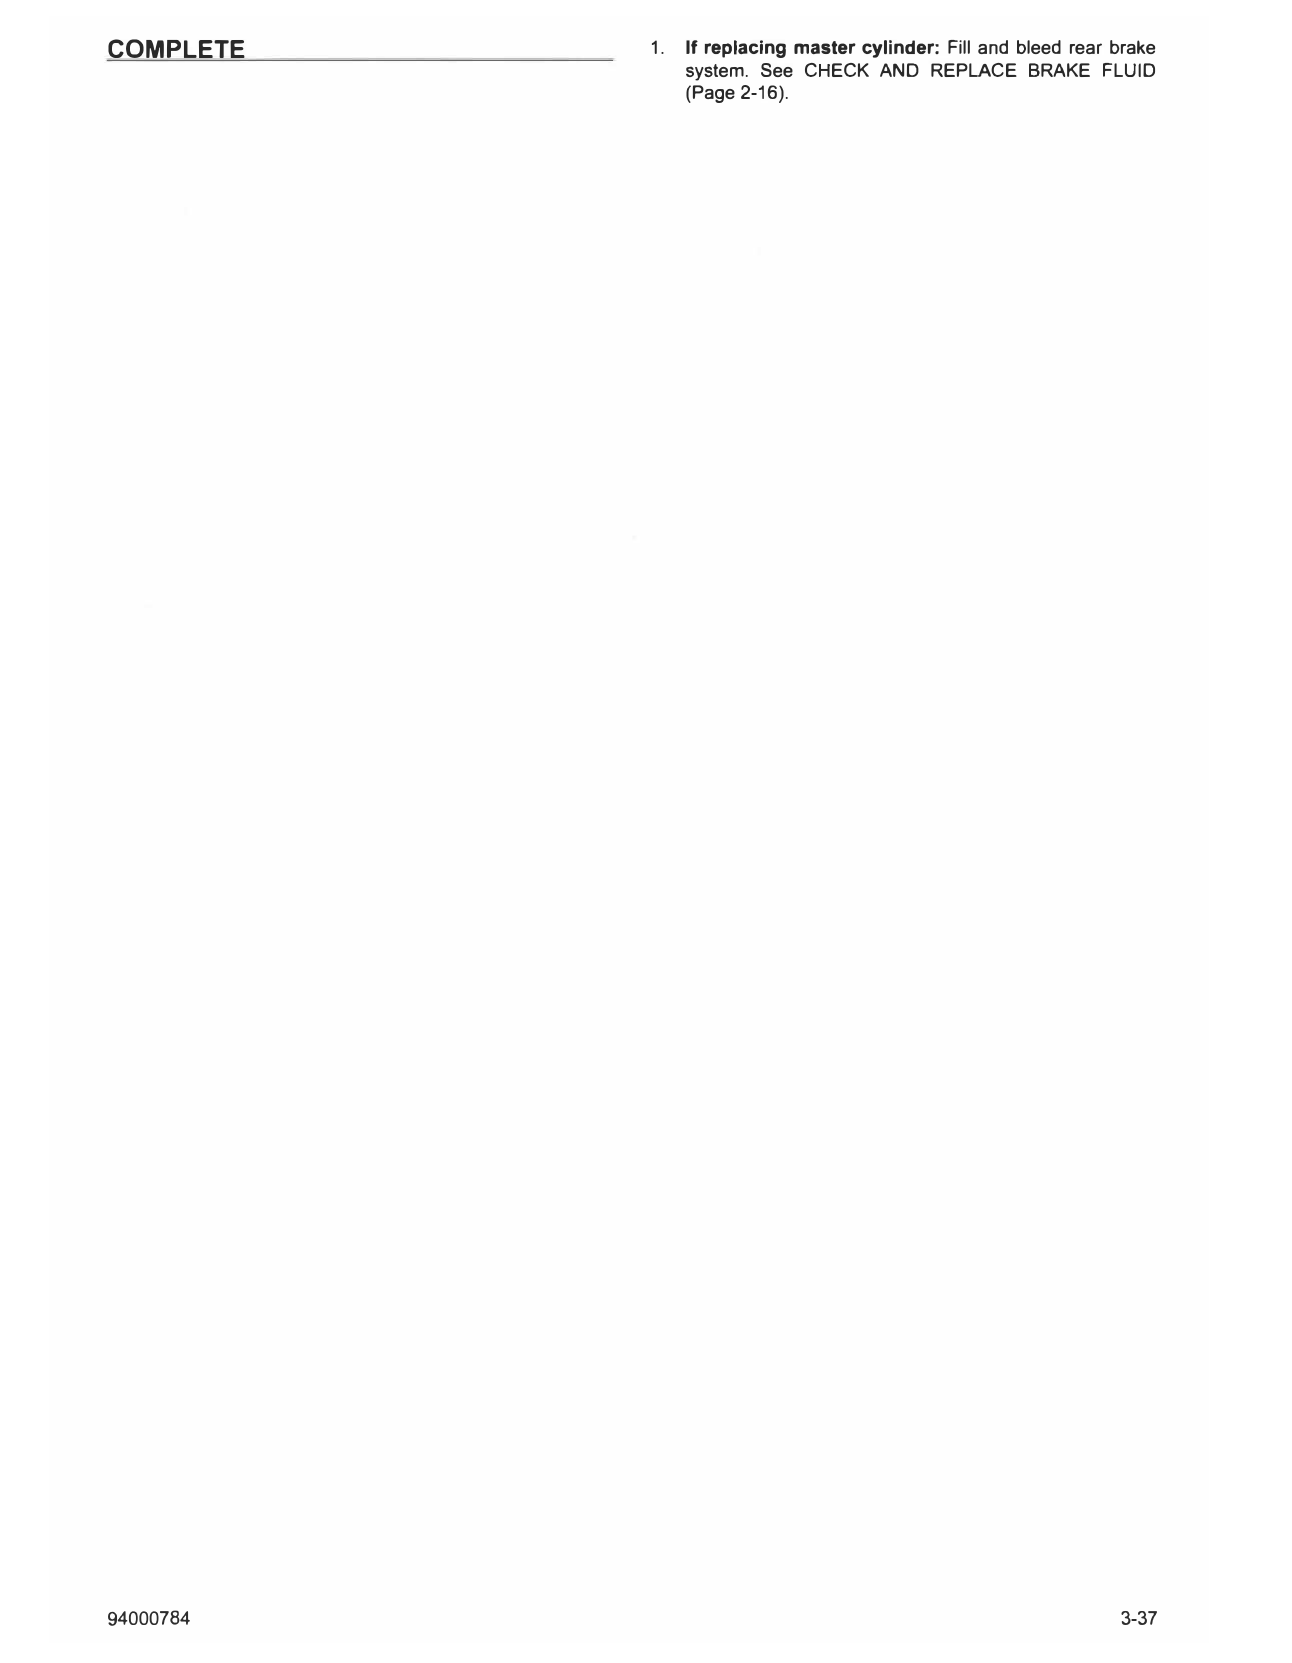
1587863
c. See Figure 3-38. Install E-cllp (13) In outboard
groove of pushrod.
1. Measurement: 3.85-3.97 in (97.9-100.9 mm)
Figure 3-38.
3-36 94000784
COMPLETE 1. If replacing master cylinder: Fill and bleed rear brake
system. See CHECK AND REPLACE BRAKE FLUID
(Page 2-16).
94000784 3-37