2.8 Inspect Brakes
Fragment manuala — str. 43–45
📋 Tekst do skopiowania (OCR/wyszukiwanie)
INSPECT BRAKES 2.8
INSPECT
Brake Disc
1. Refer to Table 2-8. Check brake disc thickness and
Brake Pads compare to value indicated in table.
Harley-Davidson has provided your new motorcycle with the 2. Replace if necessary.
optimum brake pad friction material available. It is selected to
give the best performance possible under dry, wet and high REPLACE FRONT BRAKE PADS
operating temperature conditions. It exceeds all regulatory
requirements currently in effect. However, during some braking FASTENER TORQUE VALUE
conditions you may experience noise. This is normal for this
Brake caliper, front, brake pad 44-62 in-lbs 5-7 N·m
friction material. I
hanger pin
A WARNING
Remove
Always replace brake pads in complete sets for correct
and safe brake operation. Improper brake operation could 1. Remove front caliper. See FRONT BRAKE CALIPER
result in death or serious injury. (00111a) (Page 3-32).
1. Check the brake disc as it spins. The disc should run true 2. See Figure 2-10. Remove retainer clip (1).
in the brake caliper.
3. Remove brake pad hanger pin (2).
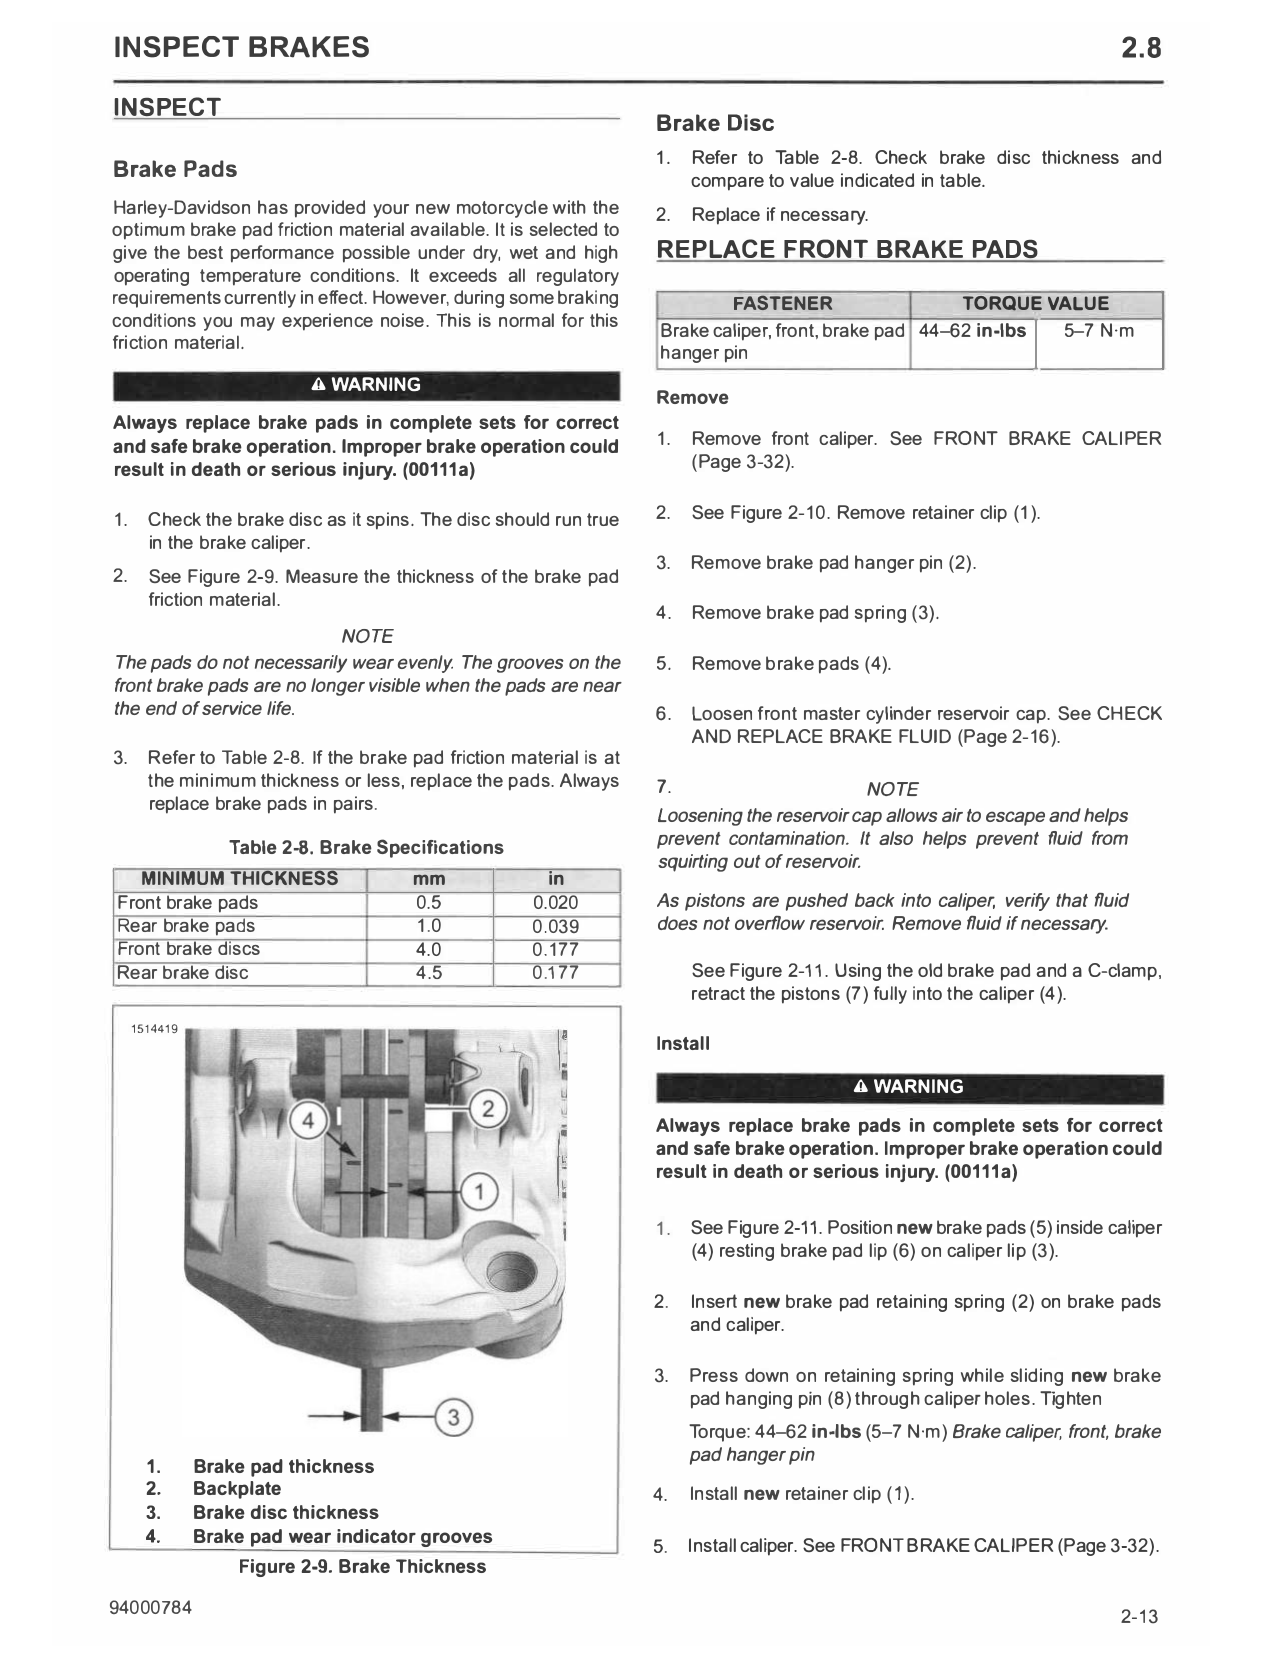
2. See Figure 2-9. Measure the thickness of the brake pad
friction material.
4. Remove brake pad spring (3).
NOTE
The pads do not necessarily wear evenly The grooves on the 5. Remove brake pads (4).
front brake pads are no longer visible when the pads are near
the end of service life. 6. Loosen front master cylinder reservoir cap. See CHECK
AND REPLACE BRAKE FLUID (Page 2-16).
3. Refer to Table 2-8. If the brake pad friction material is at
the minimum thickness or less, replace the pads. Always 7. NOTE
replace brake pads in pairs.
Loosening the reservoir cap allows air to escape and helps
Table 2-8. Brake Specifications prevent contamination. It also helps prevent fluid from
squirting out of reservoir.
MINIMUM THICKNESS mm in
Front brake pads 0.5 0.020 As pistons are pushed back into caliper, verify that fluid
Rear brake pads 1.0 0.039 does not overflow reservoir. Remove fluid if necessary.
Front brake discs 4.0 0.177
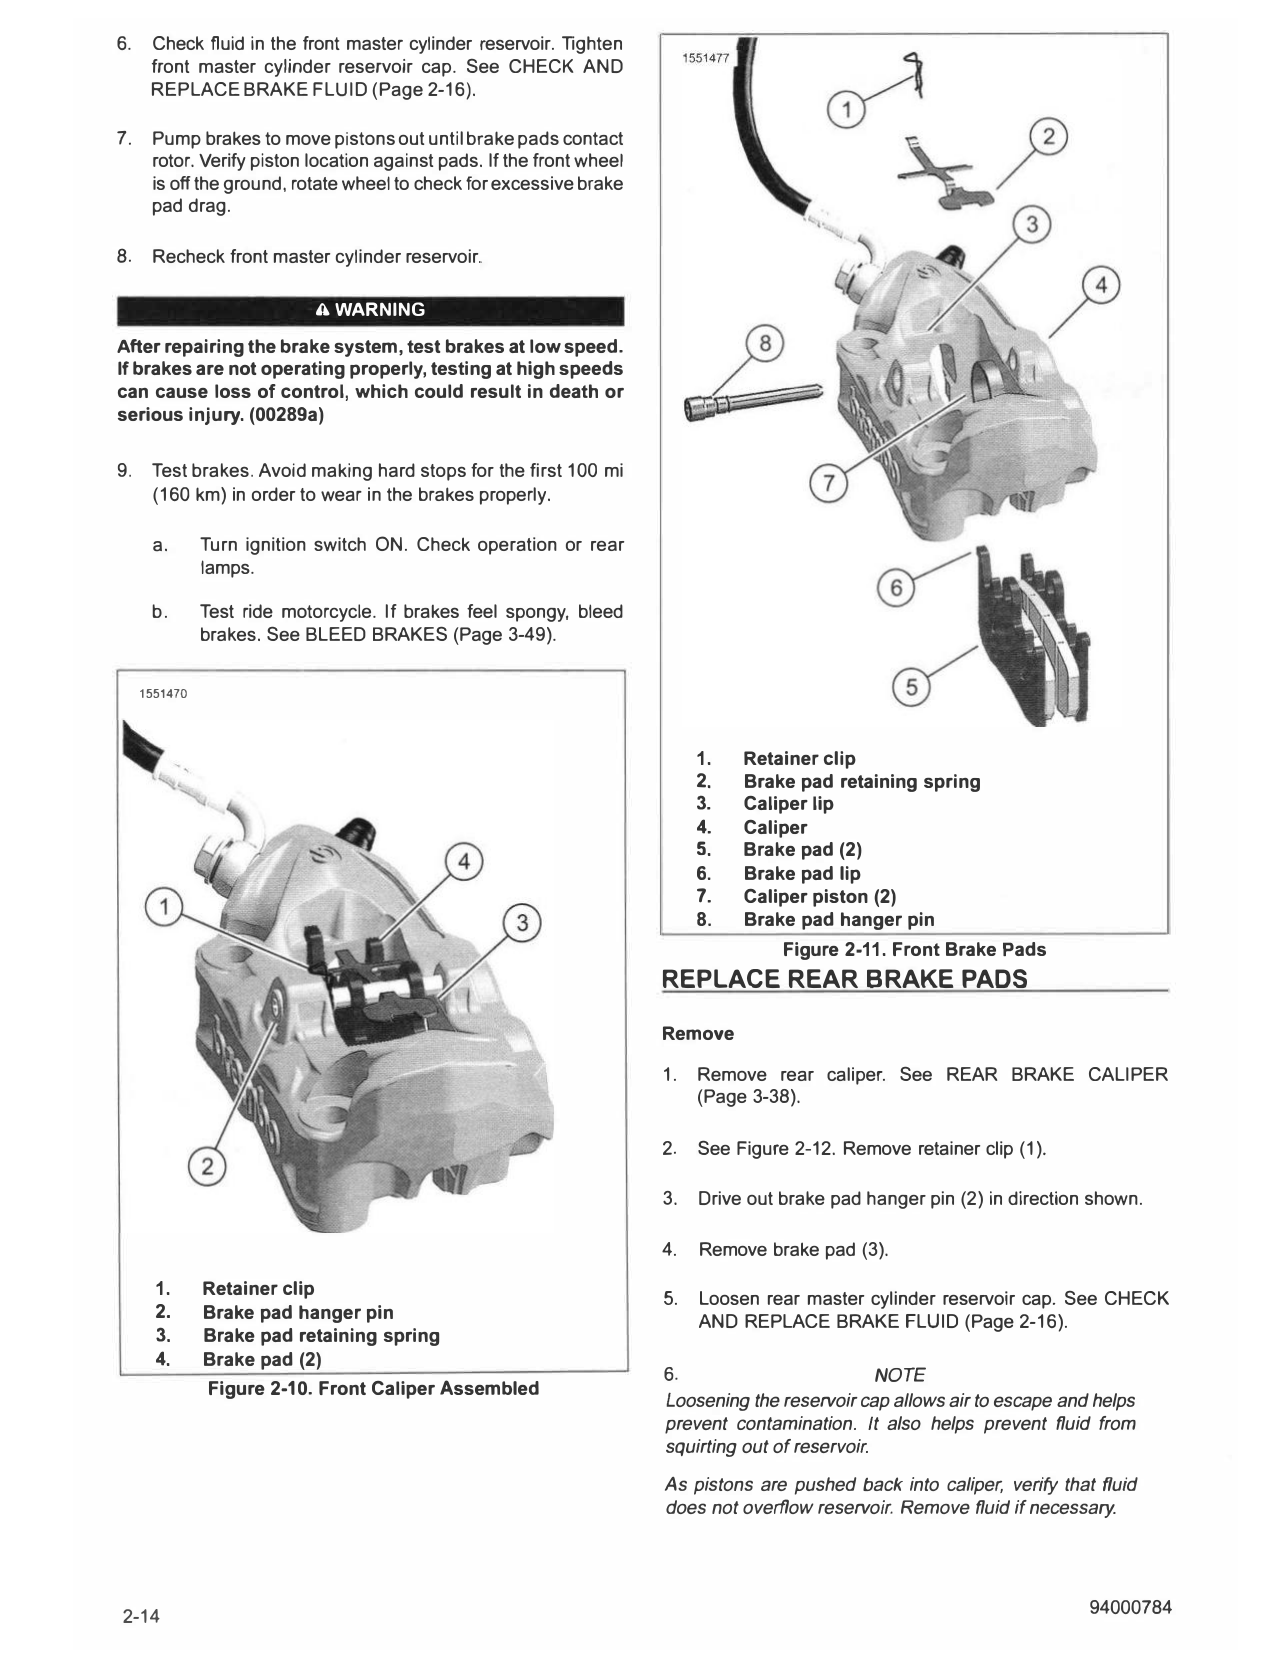
Rear brake disc 4.5 0.177 See Figure 2-11. Using the old brake pad and a C-clamp,
retract the pistons (7) fully into the caliper (4).
1514419
Install
A WARNING
Always replace brake pads in complete sets for correct
and safe brake operation. Improper brake operation could
result in death or serious injury. (00111a)
1. See Figure 2-11. Position new brake pads (5) inside caliper
(4) resting brake pad lip (6) on caliper lip (3).
2. Insert new brake pad retaining spring (2) on brake pads
and caliper.
3. Press down on retaining spring while sliding new brake
pad hanging pin (8) through caliper holes. Tighten
Torque: 44-62 in-lbs (5-7 N·m) Brake caliper, front, brake
pad hanger pin
1. Brake pad thickness
2. Backplate 4. Install new retainer clip (1 ).
3. Brake disc thickness
5. Install caliper. See FRONT BRAKE CALIPER (Page 3-32).
4. Brake pad wear indicator grooves
Figure 2-9. Brake Thickness
94000784 2-13
6. Check fluid in the front master cylinder reservoir. Tighten
front master cylinder reservoir cap. See CHECK AND
REPLACE BRAKE FLUID (Page 2-16).
7. Pump brakes to move pistons out until brake pads contact
rotor. Verify piston location against pads. If the front wheel
is off the ground, rotate wheel to check for excessive brake
pad drag.
8. Recheck front master cylinder reservoir.
A WARNING
After repairing the brake system, test brakes at low speed.
If brakes are not operating properly, testing at high speeds
can cause loss of control, which could result in death or
serious injury. (00289a)
9. Test brakes. Avoid making hard stops for the first 100 mi
(160 km) in order to wear in the brakes properly.
a. Turn ignition switch ON. Check operation or rear
lamps.
b. Test ride motorcycle. If brakes feel spongy, bleed
brakes. See BLEED BRAKES (Page 3-49).
1551470
1. Retainer clip
2. Brake pad retaining spring
3. Caliper lip
4. Caliper
5. Brake pad (2)
6. Brake pad lip
7. Caliper piston (2)
8. Brake pad hanger pin
Figure 2-11. Front Brake Pads
REPLACE REAR BRAKE PADS
Remove
1. Remove rear caliper. See REAR BRAKE CALIPER
(Page 3-38).
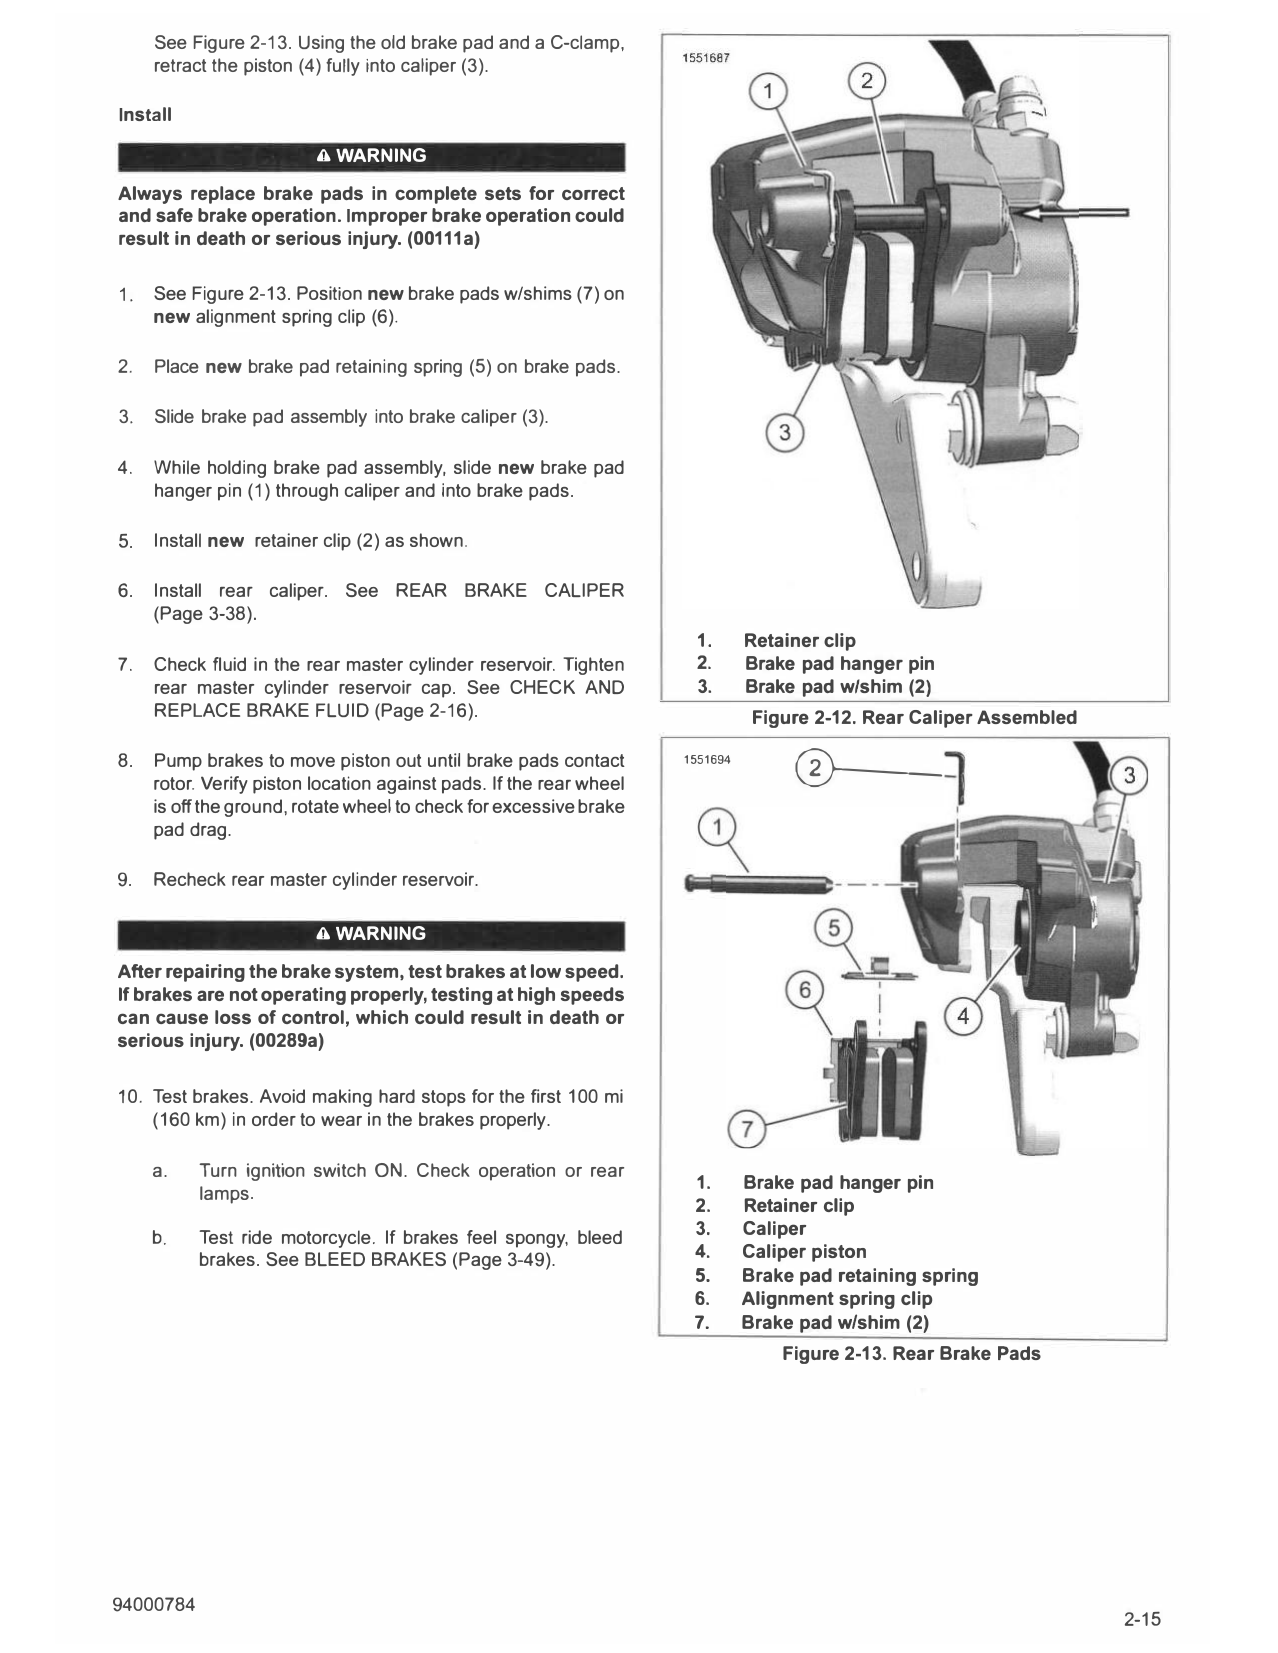
2. See Figure 2-12. Remove retainer clip (1).
3. Drive out brake pad hanger pin (2) in direction shown.
4. Remove brake pad (3).
1. Retainer clip
5. Loosen rear master cylinder reservoir cap. See CHECK
2. Brake pad hanger pin
AND REPLACE BRAKE FLUID (Page 2-16).
3. Brake pad retaining spring
4. Brake pad (2)
6. NOTE
Figure 2-10. Front Caliper Assembled
Loosening the reservoir cap allows air to escape and helps
prevent contamination. It also helps prevent fluid from
squirting out of reservoir.
As pistons are pushed back into caliper, verify that fluid
does not overflow reservoir. Remove fluid if necessary.
2-14 94000784
See Figure 2-13. Using the old brake pad and a C-clamp,
retract the piston (4) fully into caliper (3).
Install
A WARNING
Always replace brake pads in complete sets for correct
and safe brake operation. Improper brake operation could
result in death or serious injury. (00111a)
1. See Figure 2-13. Position new brake pads w/shims (7) on
new alignment spring clip (6).
2. Place new brake pad retaining spring (5) on brake pads.
3. Slide brake pad assembly into brake caliper (3).
4. While holding brake pad assembly, slide new brake pad
hanger pin (1) through caliper and into brake pads.
5. Install new retainer clip (2) as shown.
6. Install rear caliper. See REAR BRAKE CALIPER
(Page 3-38).
1. Retainer clip
7. Check fluid in the rear master cylinder reservoir. Tighten 2. Brake pad hanger pin
rear master cylinder reservoir cap. See CHECK AND 3. Brake pad w/shim (2)
REPLACE BRAKE FLUID (Page 2-16). Figure 2-12. Rear Caliper Assembled
8. Pump brakes to move piston out until brake pads contact
rotor. Verify piston location against pads. If the rear wheel
is off the ground, rotate wheel to check for excessive brake
1551694
®---
pad drag.
9. Recheck rear master cylinder reservoir.
A WARNING
After repairing the brake system, test brakes at low speed.
If brakes are not operating properly, testing at high speeds
can cause loss of control, which could result in death or
serious injury. (00289a)
10. Test brakes. Avoid making hard stops for the first 100 mi
(160 km) in order to wear in the brakes properly.
a. Turn ignition switch ON. Check operation or rear
1. Brake pad hanger pin
lamps.
2. Retainer clip
b. Test ride motorcycle. If brakes feel spongy, bleed 3. Caliper
brakes. See BLEED BRAKES (Page 3-49). 4. Caliper piston
5. Brake pad retaining spring
6. Alignment spring clip
7. Brake pad w/shim (2)
Figure 2-13. Rear Brake Pads